How to Disable WordPress Plugins From Loading on Specific Pages and Posts
- Category : WordPress
- Posted on : May 14, 2019
- Views : 2,376
- By : Hagen V.

When it comes to WordPress performance, we have a lot to say about plugins. Each plugin adds PHP code that has to be executed, usually includes scripts and styles, and may even execute additional queries against the database. This means that unnecessary plugins can affect page speed and may have a negative impact on the user experience and your page ranking.
As an example, consider a plugin that builds and displays custom forms on front pages, like Contact Form 7. Typically, you would only need one form on a single page, but ideally, you may want to embed a form on any page using the plugin’s shortcode. For this reason, Contact Form 7 loads scripts and styles on every page of your website.
But do you really want to run the plugin code and include scripts and styles on every page of your WordPress website?
In this post, I will show you how to prevent unnecessary plugins from loading on specific posts/pages, so that you can install additional plugins (don’t go crazy of course), and still have your WordPress website load fast. To accomplish this task, we’re going to disable WordPress plugins programmatically on specific posts and pages. This is a four-step process:
- Choose the most popular plugins that fit your needs, and compare their features and effects on page speed.
- Programmatically list and filter plugins before page loads.
- Programmatically filter and deactivate unnecessary plugins with a mu-plugin.
- Filter and deactivate unnecessary plugins using a plugin.
- Track the site performance.
Let’s dive deep.
Three General Rules to Follow When Choosing a Plugin
The following general rules can be helpful when choosing a plugin:
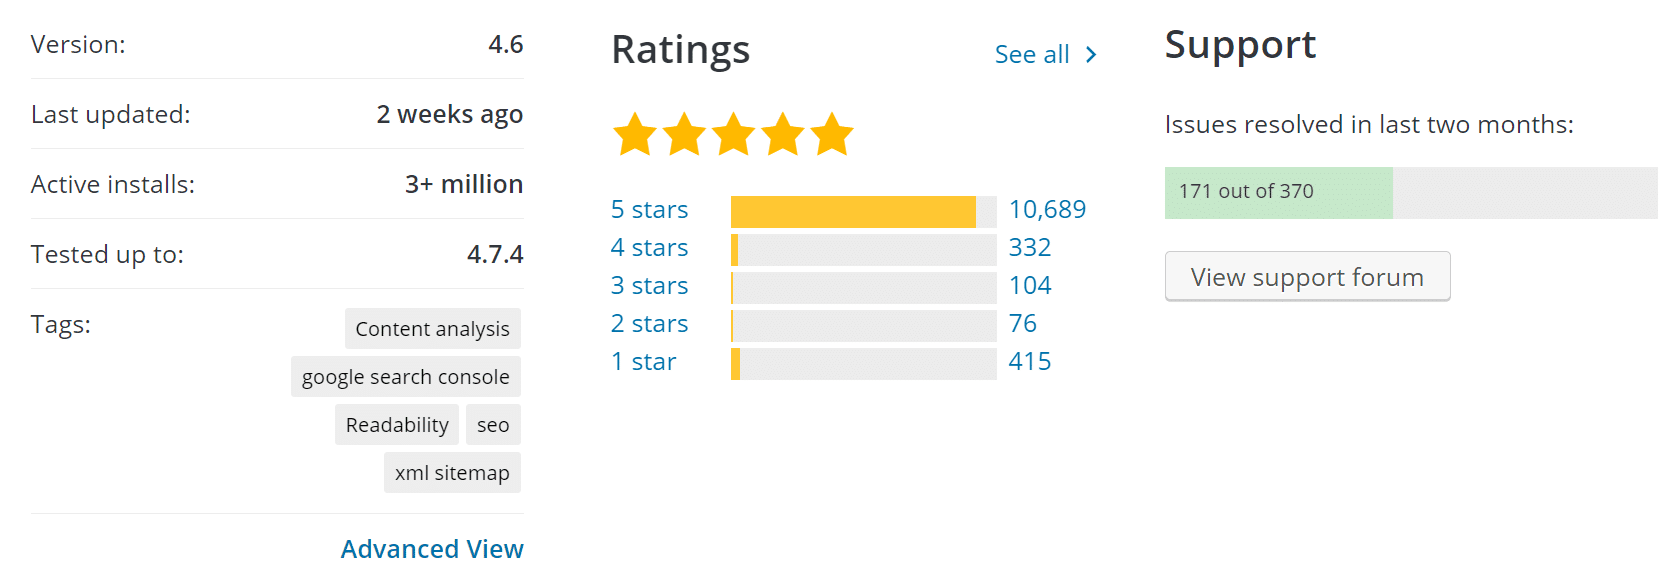
- Install only well-coded plugins from trusted developers: consider active installs, user rating, client support, update frequency, and any useful piece of information coming from the WordPress community.
- Prefer scalable plugins: compare similar plugins in terms of performance, making use of browser dev tools and/or online services like Google Pagespeed Insights, Pingdom, and GTmetrix to evaluate the impact of each plugin on page load time.
- Do not install unnecessary plugins: it should be obvious, but it’s worth mentioning that you should never install a plugin you don’t really need for security and performance reasons. Also, make sure you review your plugins from time to time and uninstall those you don’t need and use anymore.
A Real Life Example
Contact Form 7 is a great plugin that builds and displays forms in WordPress. It provides a perfect example for our purposes, because it includes the following files on every page, even if the page doesn’t contain a form:
- style.css
- scripts.js
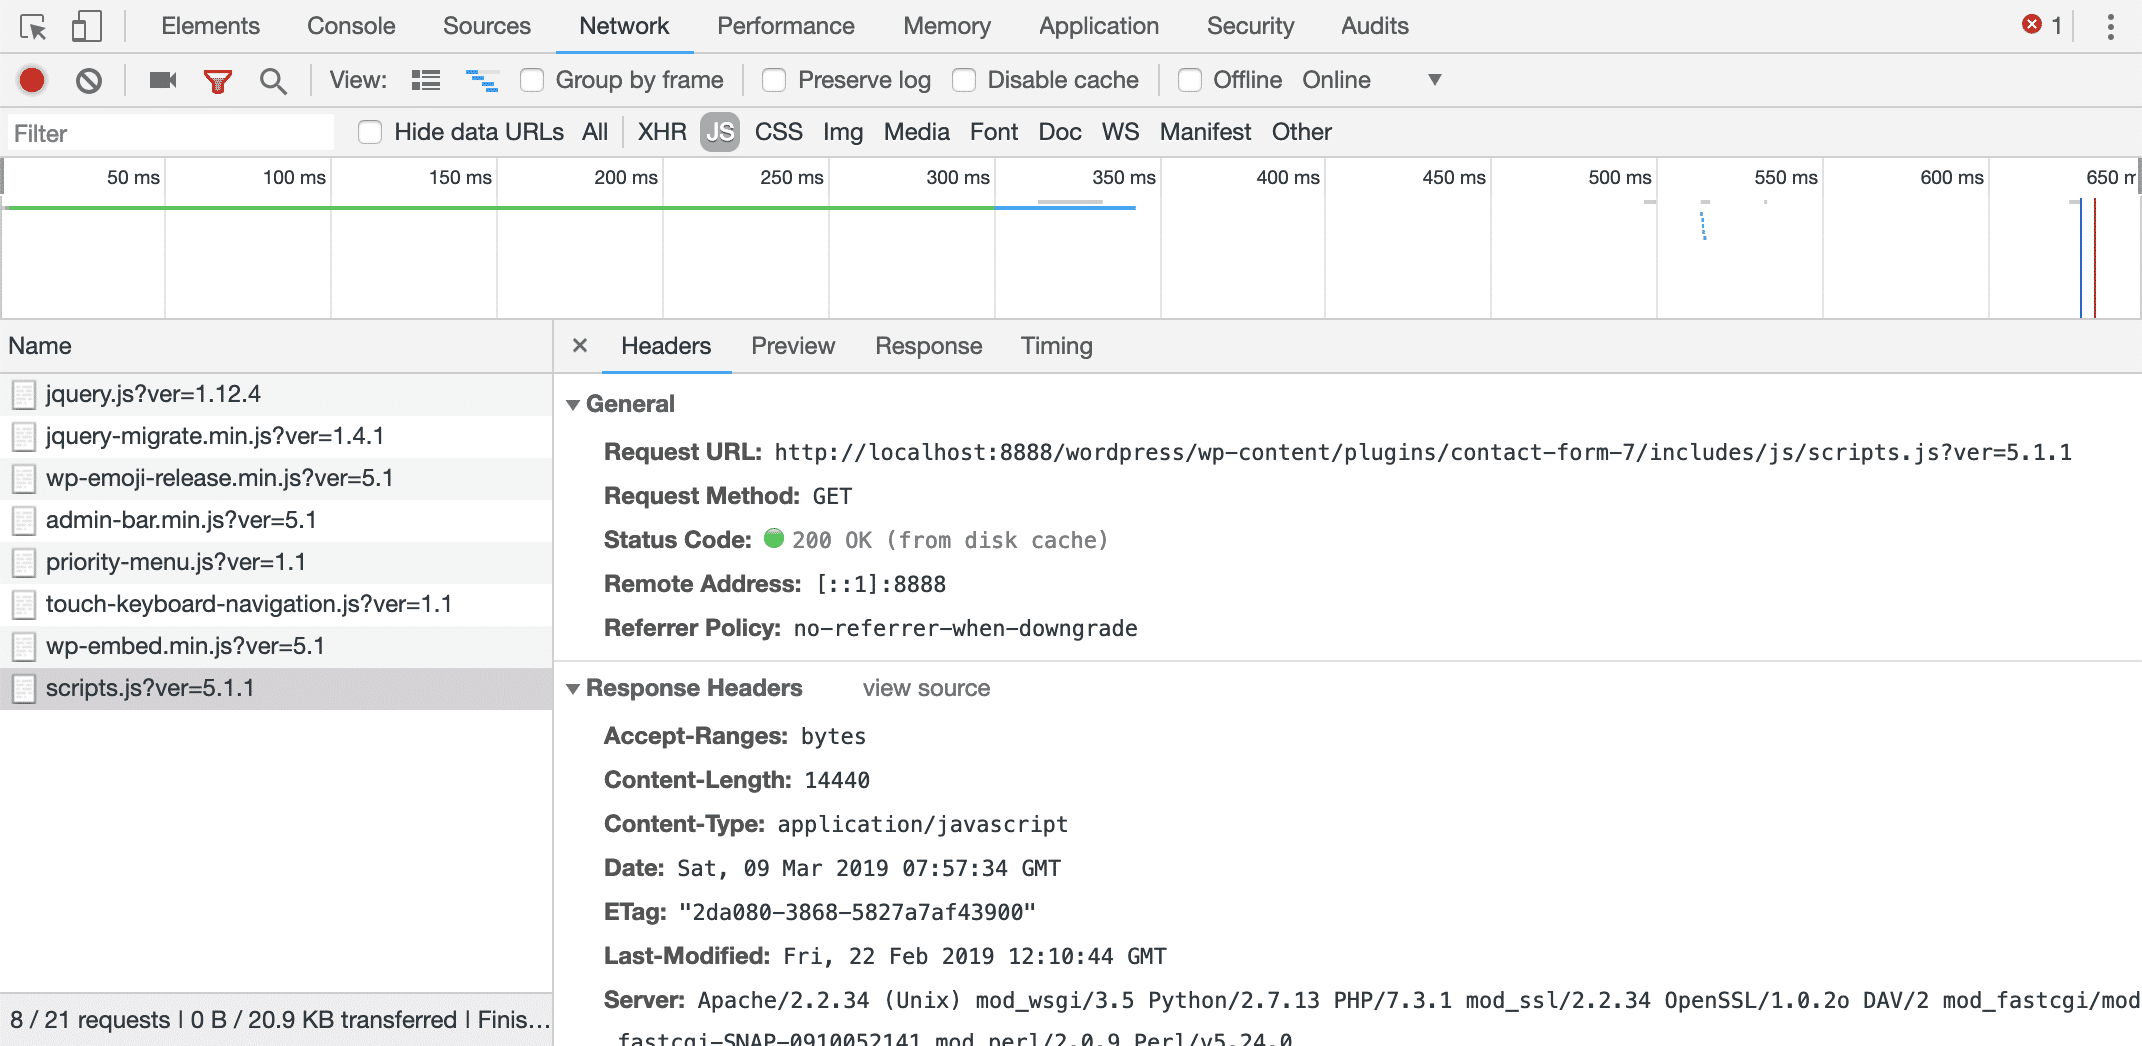
A plugin can slow down your website, but we can force WordPress to selectively deactivate plugins depending on the request URL. If you’re a developer, read over the next section where we’ll learn how to programmatically manage plugins and build a mu-plugin that filters unnecessary plugins. If you are not a developer, feel free to hop over to the section dedicated to plugins that allow to filter and organize plugins.
How To Get a List of All Active Plugins Programmatically
First off, you can get a list of all active plugins on your WordPress website with a simple snippet of PHP code. You can add the following code either in a custom plugin, or in the editor of a free WordPress plugin like Code Snippets. If you’d decide to go with your custom plugin, just don’t forget to add the plugin header as seen below.
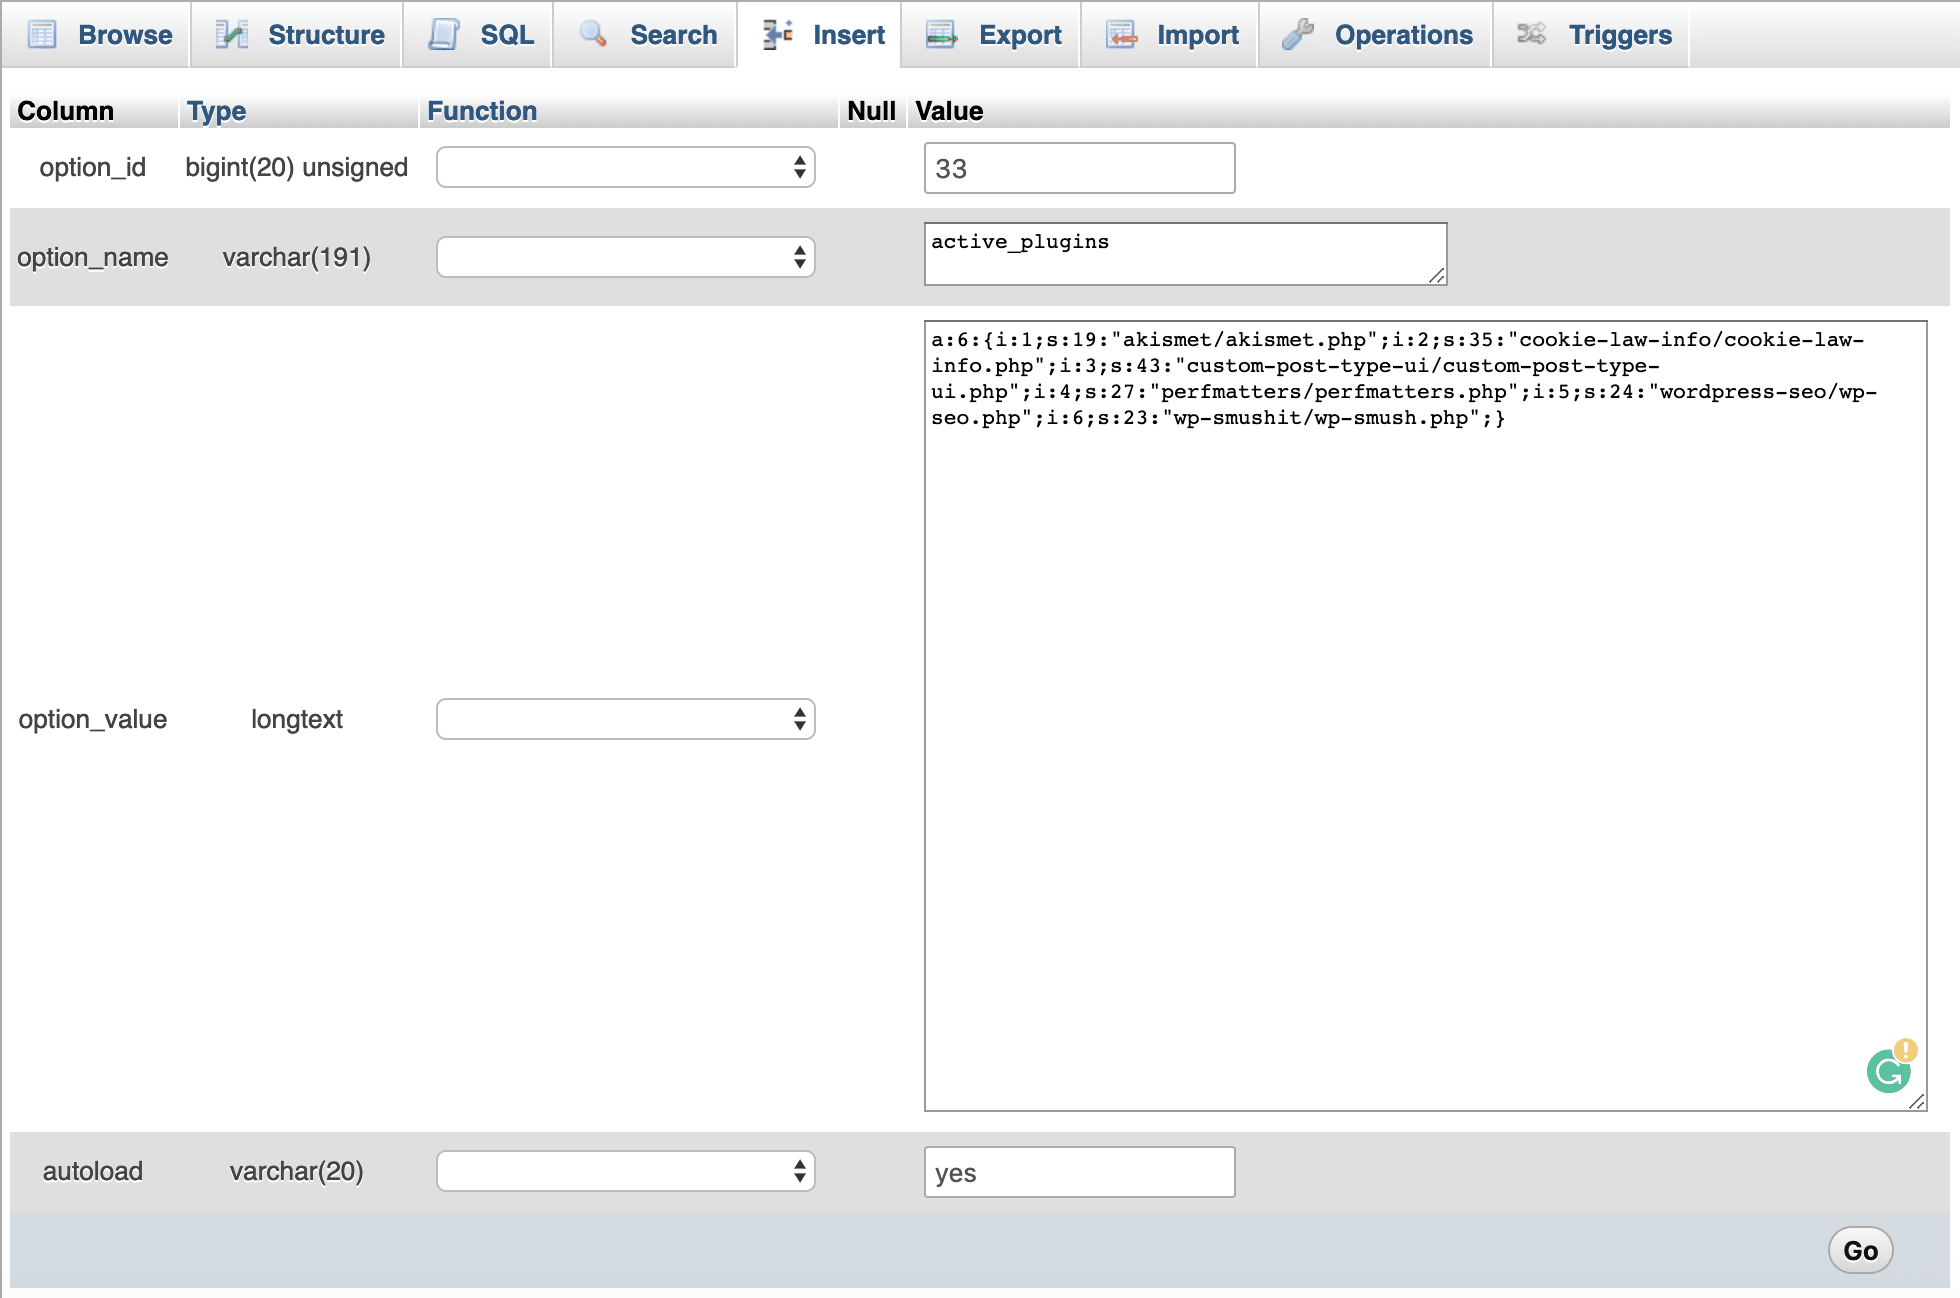
Each active plugin is stored in wp_options table where options_name is active_plugins. So we can extract the list of those plugins with a simple get_option call. Here is the code:
<?php
/**
 * @package active-plugins
 * @version 1.0
 *
 * Plugin Name: Active Plugins
 * Plugin URI: http://wordpress.org/extend/plugins/#
 * Description: This is a development plugin
 * Author: Your Name
 * Version: 1.0
 * Author URI: https://example.com/
 */
add_shortcode( 'activeplugins', function(){
$active_plugins = get_option( 'active_plugins' );
$plugins = "";
if( count( $active_plugins ) > 0 ){
$plugins = "<ul>";
foreach ( $active_plugins as $plugin ) {
$plugins .= "<li>" . $plugin . "</li>";
}
$plugins .= "</ul>";
}
return $plugins;
});
Change the plugin details, then save the active-plugins.php file and upload it onto your /wp-content/plugins/ folder. Create a new blog post and include the [activeplugins] shortcode. It should now display a list of all active plugins.
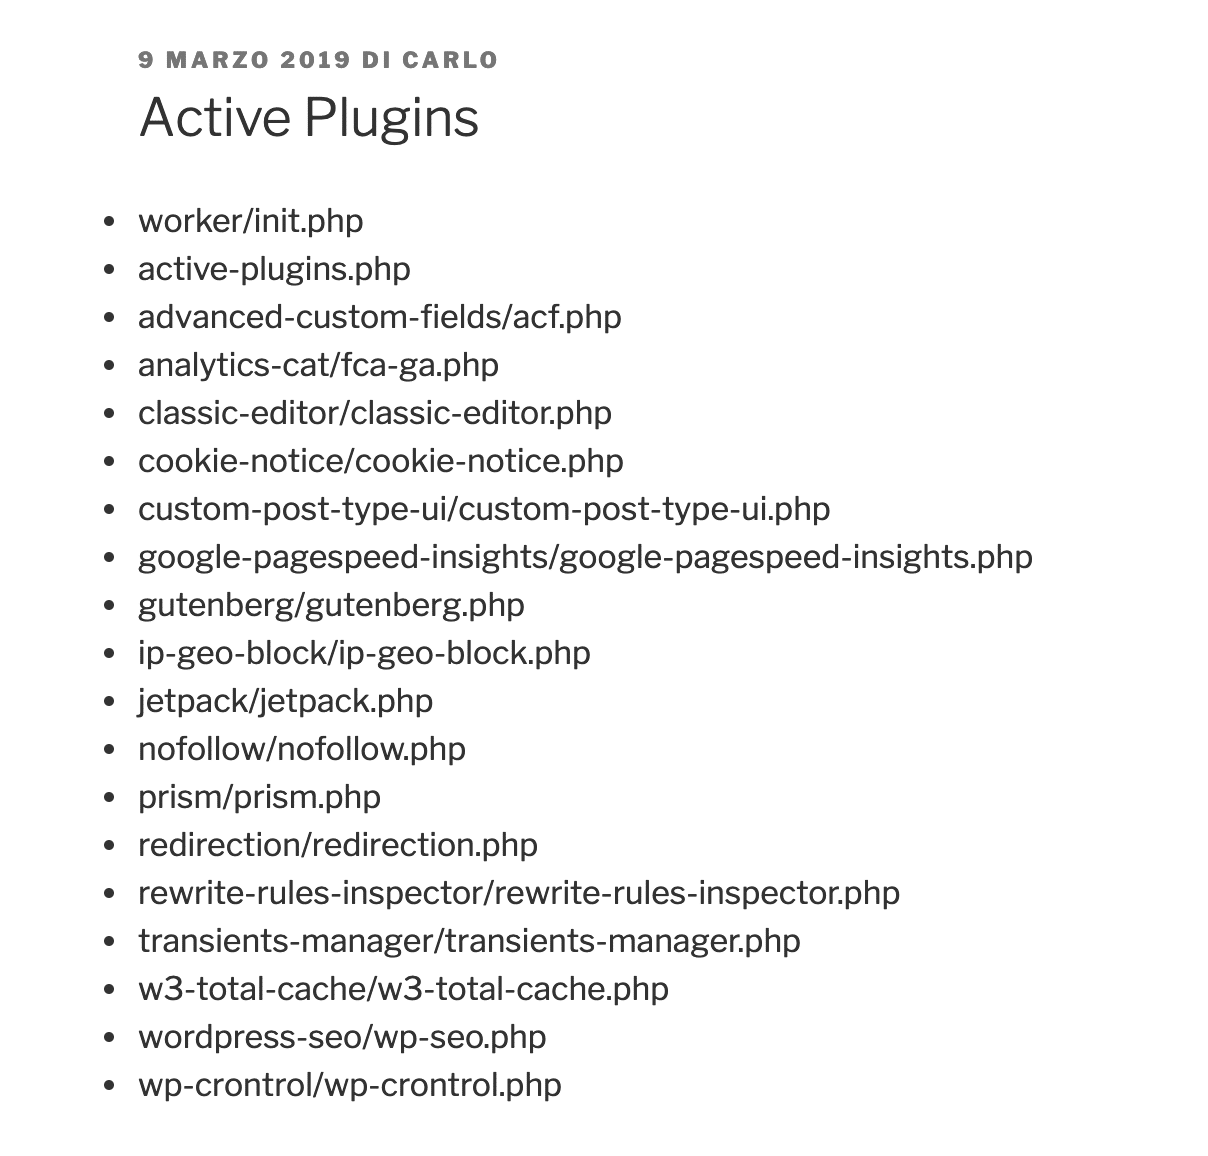
With that being done, we can go a step further and add or remove plugins programmatically by taking advantage of the option_active_plugins filter. This filter belongs to the option_$option_name group of filters, which allow to filter any option after it’s been retrieved from the database. Since all active plugins are stored in wp_options table where option_value is active_plugins, the option_active_plugins filter provides a way to programmatically activate or deactivate plugins.
So we can activate a plugin programmatically. Say, as an example, you want to activate the ACF plugin. Here is the code:
add_filter( 'option_active_plugins', function( $plugins ){
$myplugin = "advanced-custom-fields/acf.php";
if( !in_array( $myplugin, $plugins ) ){
$plugins[] = $myplugin;
}
return $plugins;
} );
In this example, we are assuming that the plugin has been installed and hasn’t been activated yet.
The code above simply adds the plugin to the list of active plugins on every page of our website. Not very useful, but you get the point.
Moreover, the plugin should load before any other plugin, otherwise, our code could not work as expected. In order to prioritize our plugin load, we have to add our script in a Must-use plugin.
How to Build a Must-use Plugin to Programmatically Deactivate Plugins
We are going to build a Must use plugin, which is a plugin residing in a specific /wp-content sub-folder, and runs before any regular plugin.
Unfortunately, in this situation, we are not allowed to use conditional tags, because conditional query tags do not work before the query is run. Before then, they always return false. So we have to check our conditions otherwise, such as by parsing the request URI and checking the corresponding URL path.
Add the following code to the active-plugins.php file, then move it to /wp-content/mu-plugins:
$request_uri = parse_url( $_SERVER['REQUEST_URI'], PHP_URL_PATH );
$is_admin = strpos( $request_uri, '/wp-admin/' );
if( false === $is_admin ){
add_filter( 'option_active_plugins', function( $plugins ){
global $request_uri;
$is_contact_page = strpos( $request_uri, '/contact/' );
$myplugin = "contact-form-7/wp-contact-form-7.php";
$k = array_search( $myplugin, $plugins );
if( false !== $k && false === $is_contact_page ){
unset( $plugins[$k] );
}
return $plugins;
} );
}
Let’s dive into this code:
- parse_url returns the path of the requested URL.
- strpos finds the position of the first occurrence of
'/wp-admin/', and returnsfalseif the string is not found.$is_adminvariable stores the returned value. - The condition prevents the filter to be run in the admin panel, so that we can safely access plugin settings pages. If the request URI does not contain
'/wp-admin/', then we invoke theoption_active_pluginsfilter. - Finally, if the current plugin is not in the array of active plugins, and the current page’s URI does not contain
/contact/, then we remove the plugin from$plugins.
Now save your plugin and upload it to your /wp-content/mu-plugins/ folder. Clear the cache and add the [activeplugins] shortcode to several pages. It should be shown in the list only on the /contact/ page.
We can then unset an array of plugins at once with just a bit of additional PHP.
$request_uri = parse_url( $_SERVER['REQUEST_URI'], PHP_URL_PATH );
$is_admin = strpos( $request_uri, '/wp-admin/' );
if( false === $is_admin ){
add_filter( 'option_active_plugins', function( $plugins ){
global $request_uri;
$is_contact_page = strpos( $request_uri, '/contact/' );
$myplugins = array(
			"contact-form-7/wp-contact-form-7.php",
			"code-snippets/code-snippets.php",
"query-monitor/query-monitor.php",
"autoptimize/autoptimize.php"
		);
if( false === $is_contact_page ){
$plugins = array_diff( $plugins, $myplugins );
}
return $plugins;
} );
}
In this example, we’ve first defined an array of plugins to be removed, then we remove them with array_diff. This function “compares array1 against one or more other arrays and returns the values in array1 that are not present in any of the other arrays”.
You can download the full code of this plugin from Gist.
Now you can upload the plugin to the mu-plugins folder and inspect any page of your website. The mu-plugin can be highly customized adding more conditions and checking more URIs, but each condition has to be manually added to the code, and in the long run, this simple mu-plugin could be difficult and a hassle to maintain.
For this reason, you may want to check out the following plugins.
Plugins That Filter Plugins
As an alternative, we can look at a number of good plugins that allow us to add filters that can be managed from the WordPress admin panel.
Plugin Load Filter
Plugin Load Filter is a free option for WordPress users who need to filter plugins under several conditions.
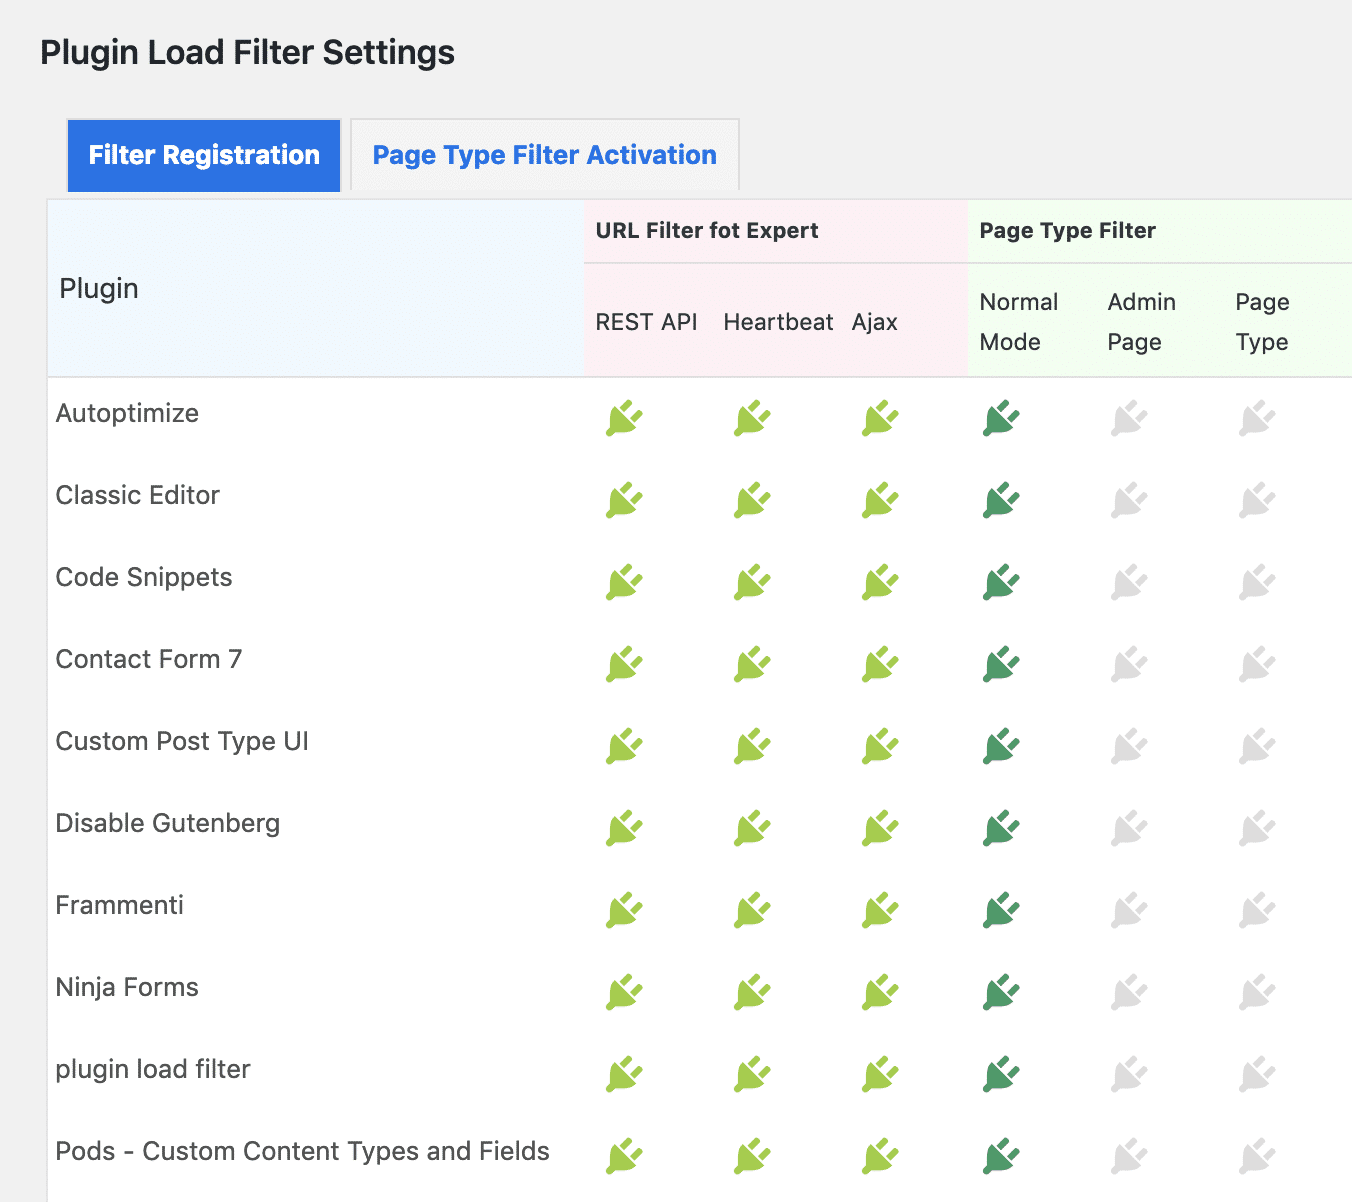
Currently, it supports the following features:
- Post formats
- Custom post types
- Jetpack modules
- WP Embed content card
- URL Filter for Expert (REST API / Heartbeat / AJAX / AMP / etc)
Once a filter has been activated, the admin user can specify where in the site it has to be applied, as shown in the image below.

Plugin Organizer
Plugin Organizer is a popular plugin with over 10,000 active installs and an impressive 5 out of 5-star rating. It is a more comprehensive plugin allowing site admins to:
- Selectively deactivate plugins by post type and request URL
- Selectively deactivate plugins by user roles
- Create groups of plugins
- Change the plugin loading order
- Additional features
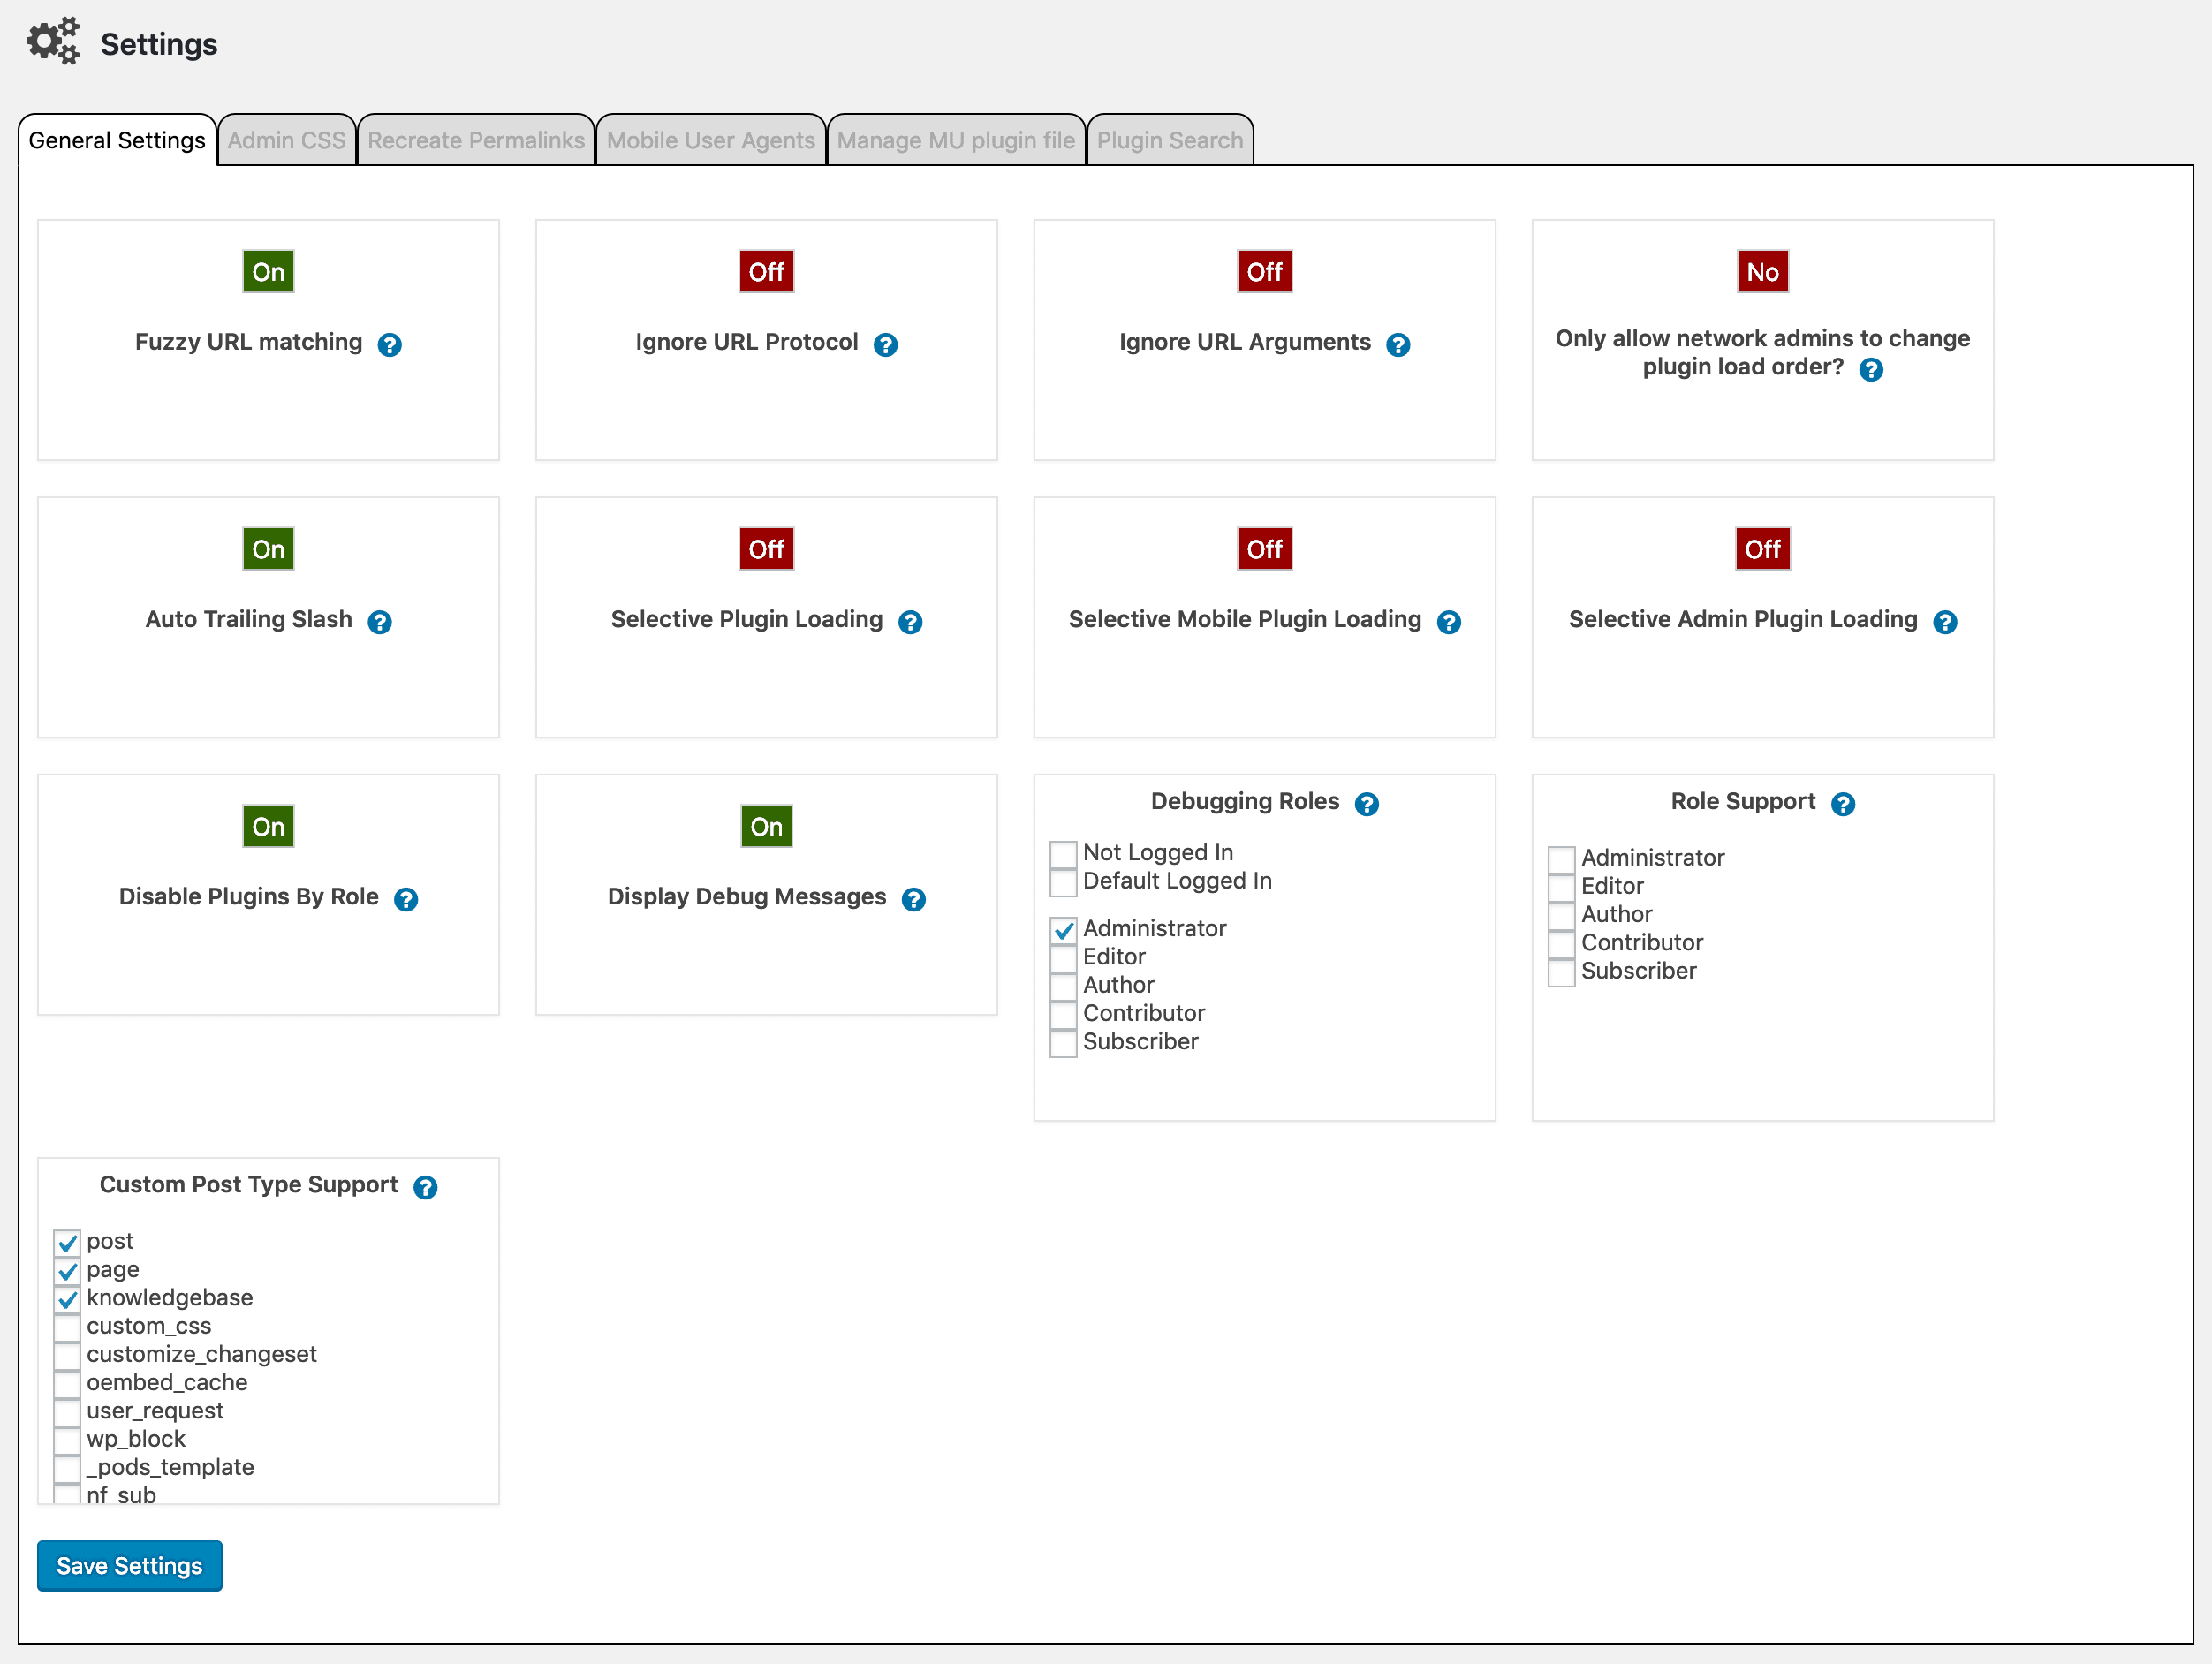
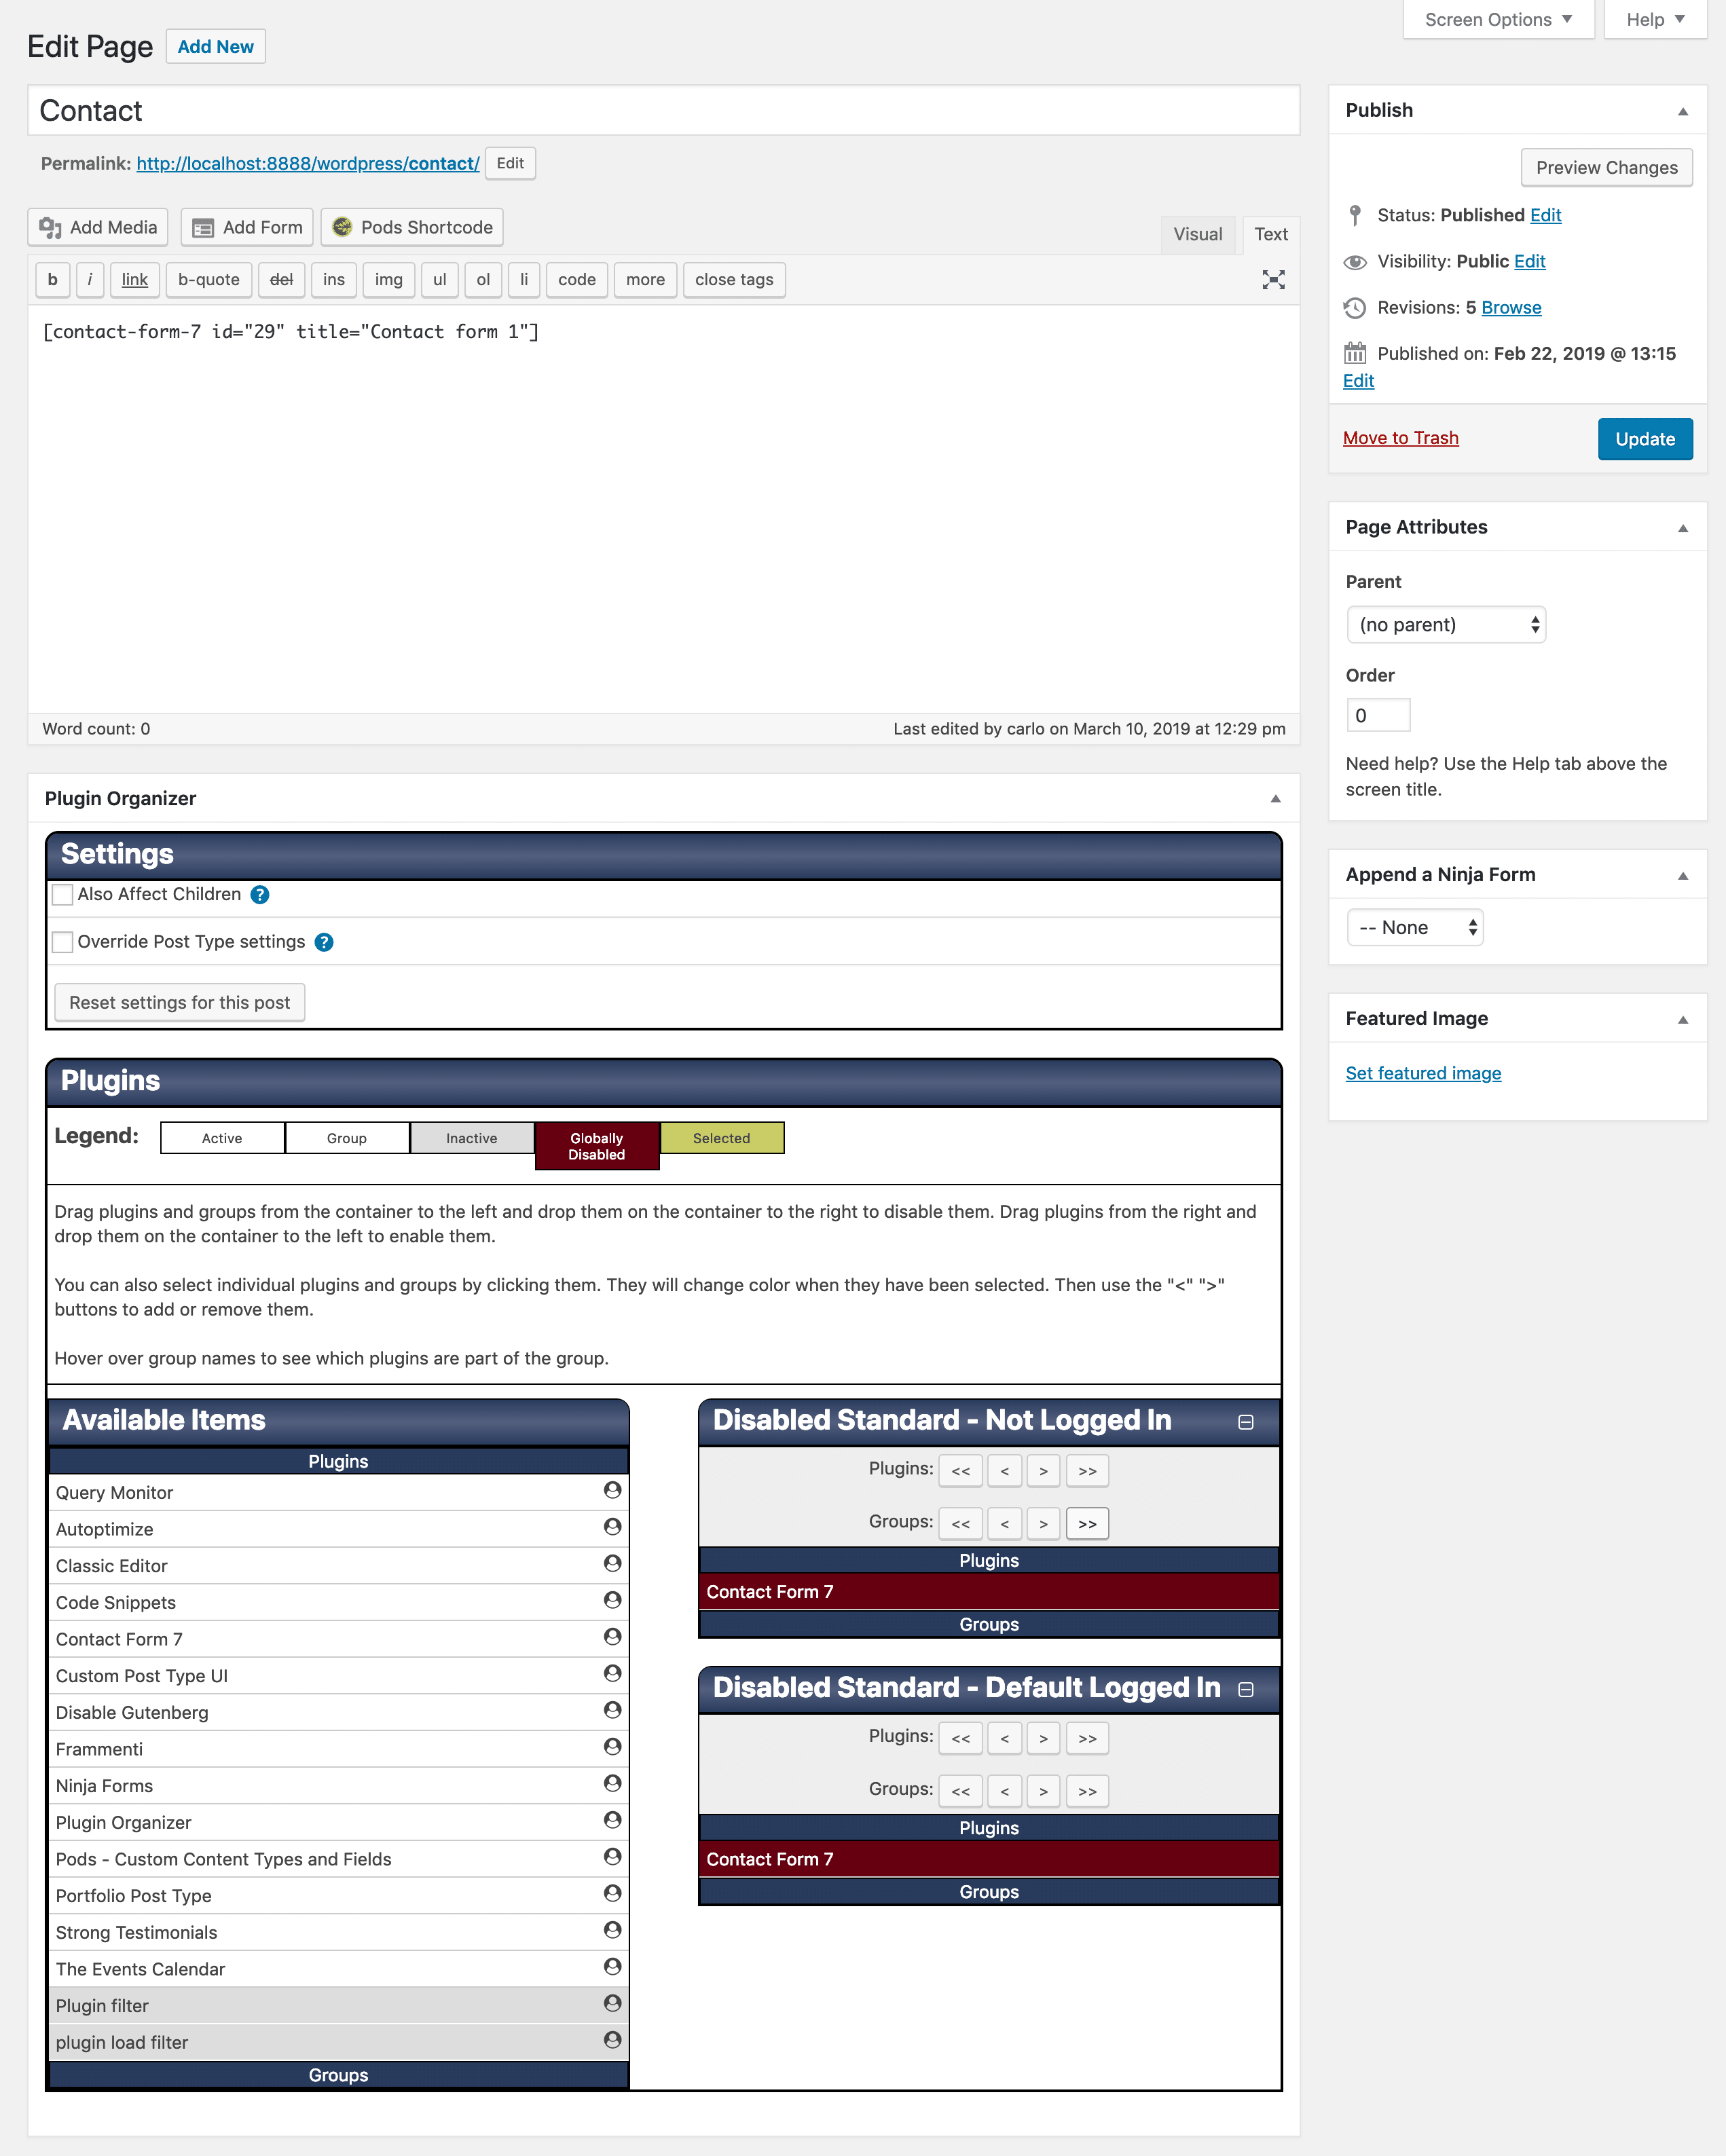
The Global Plugins options page provides a drag&drop facility that allows the admin user to globally disable plugins, preventing WordPress to run one or more plugins anywhere in the site, unless it’s differently specified for single posts or pages. The same feature is available for search page and post types.
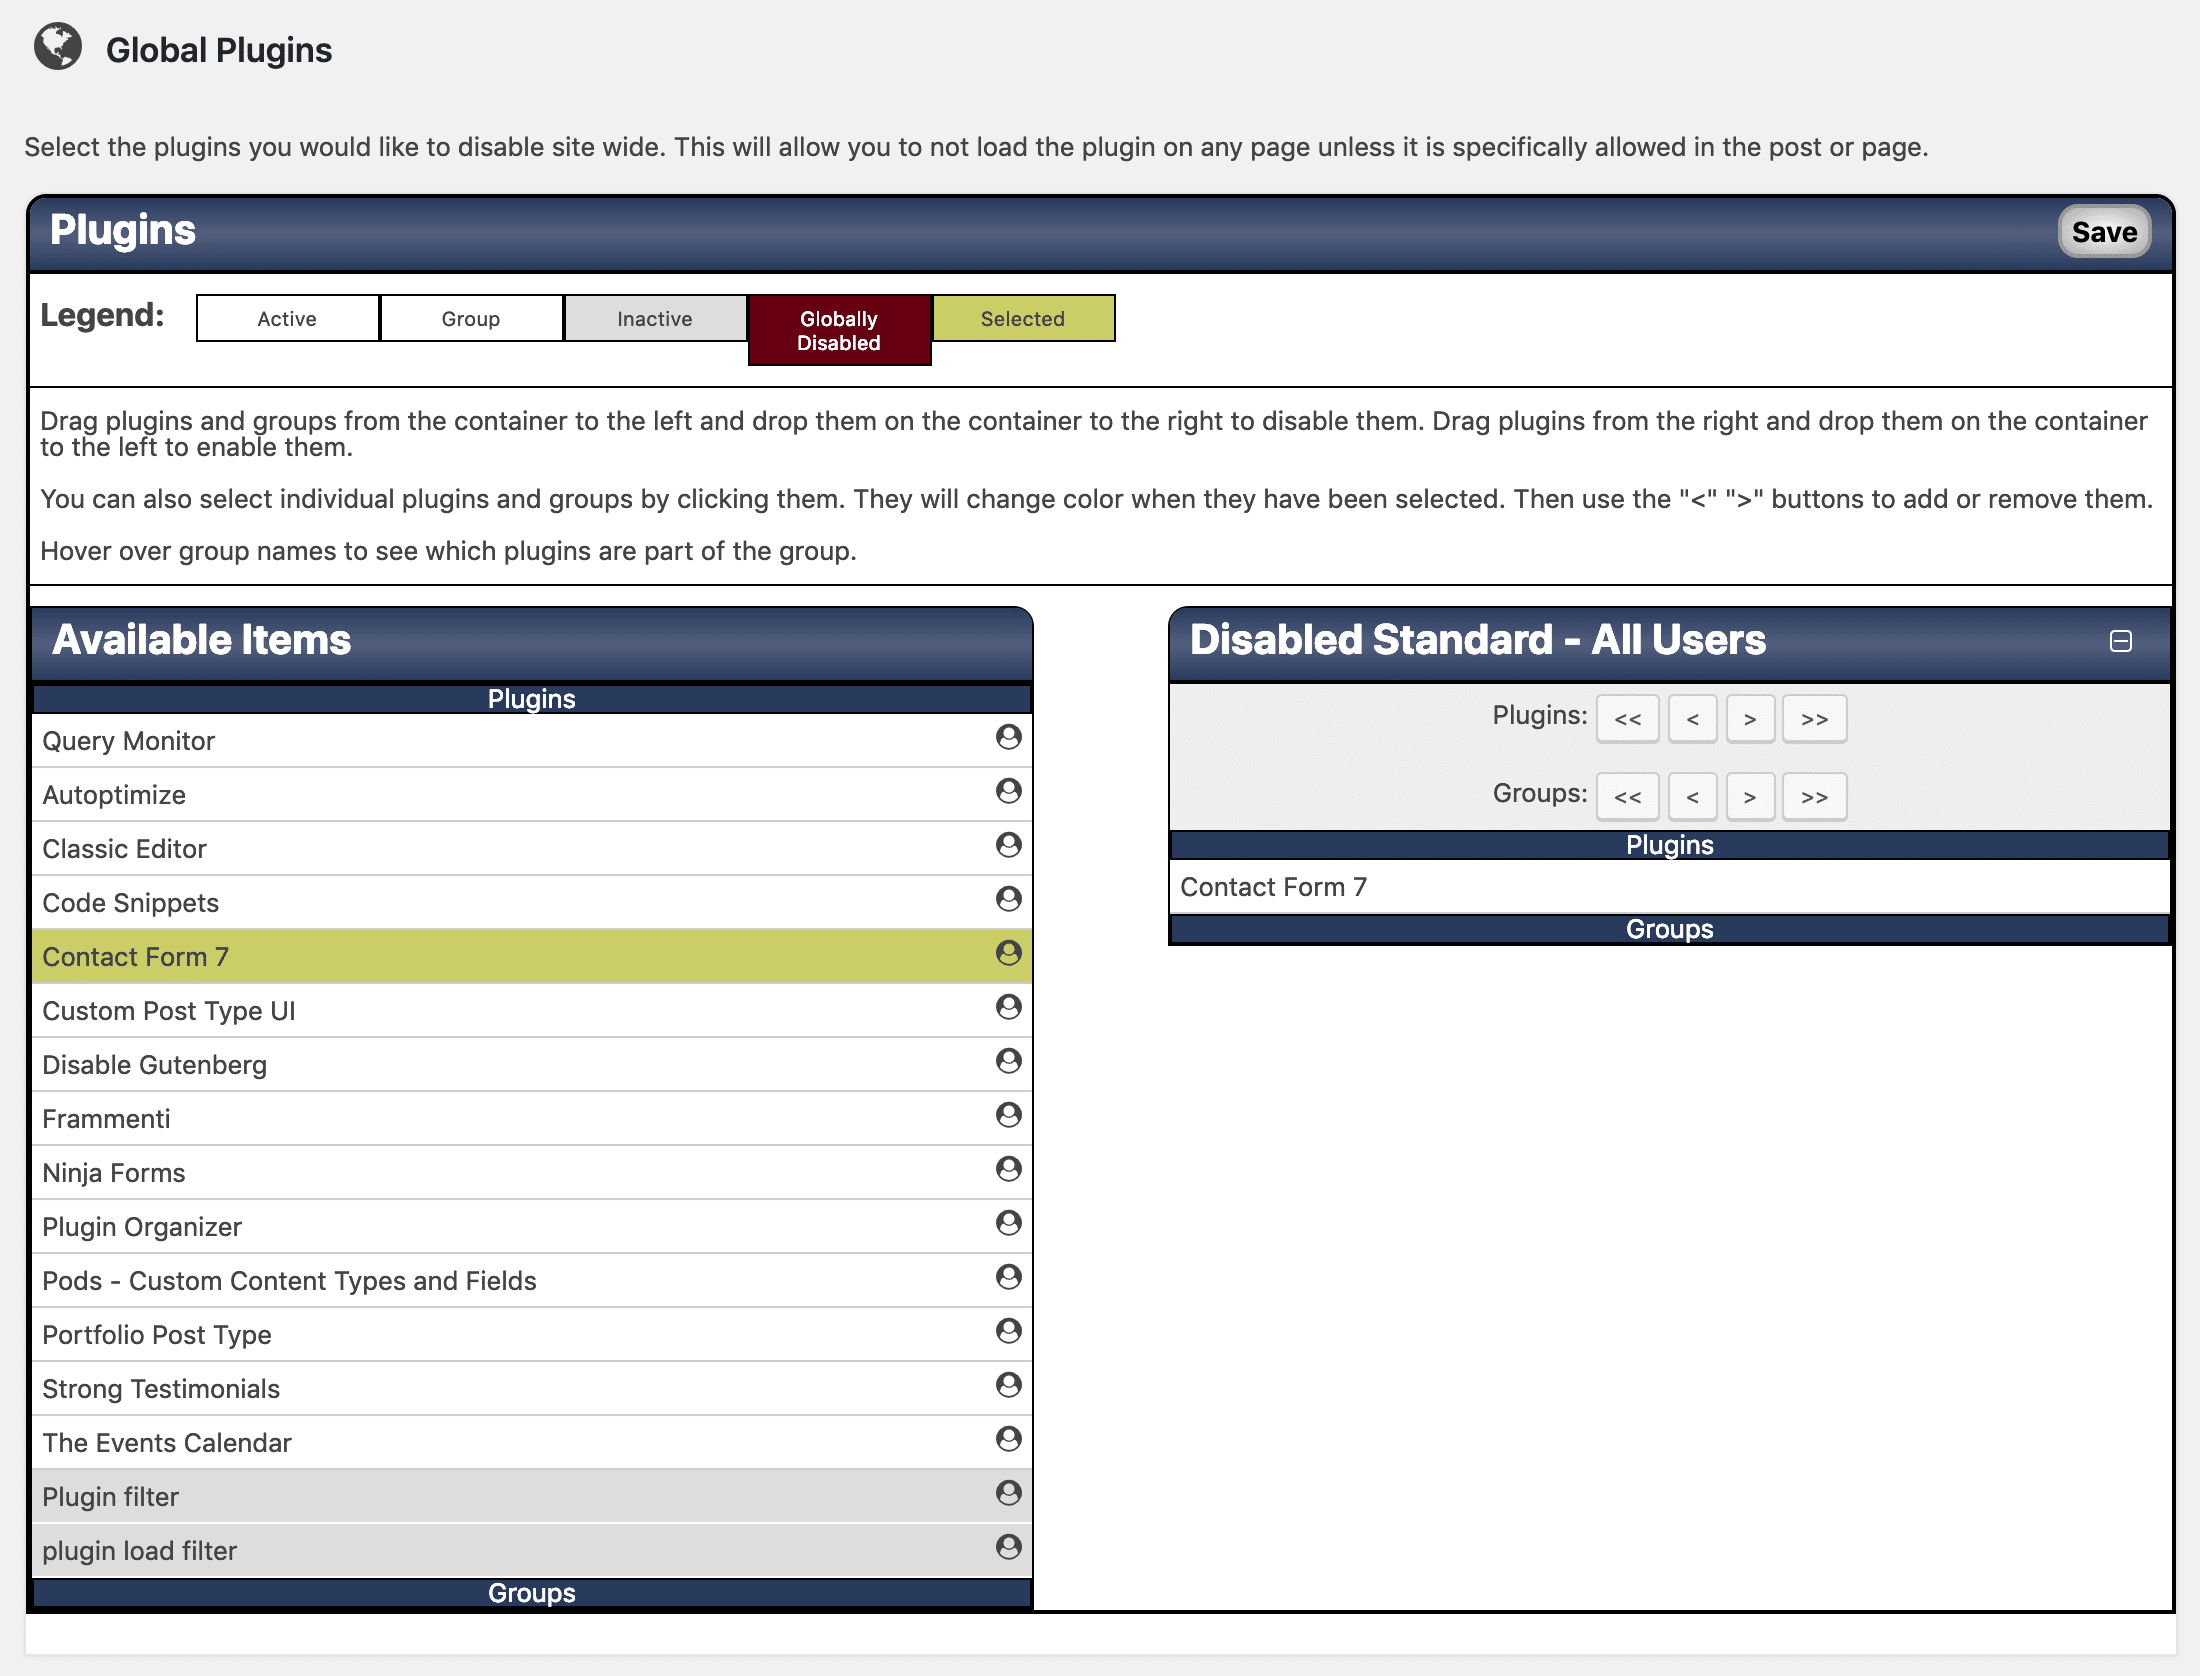
The plugin adds a metabox in the post editing screen so that the admin is allowed to override global and post type settings. This feature can be activated for post types as well, by checking the corresponding item in the General Settings screen. A great feature is the Plugin Organizer Debug Message, which provides the site admin with useful information about plugins affecting every site page.
More information can be found in their documentation.
Perfmatters Plugin
A partially different approach comes from the Perfmatters plugin. It’s a premium alternative that allows the site admin to selectively load theme and plugin assets depending on URL or custom post type. It is a great tool for both plugin and theme optimization.
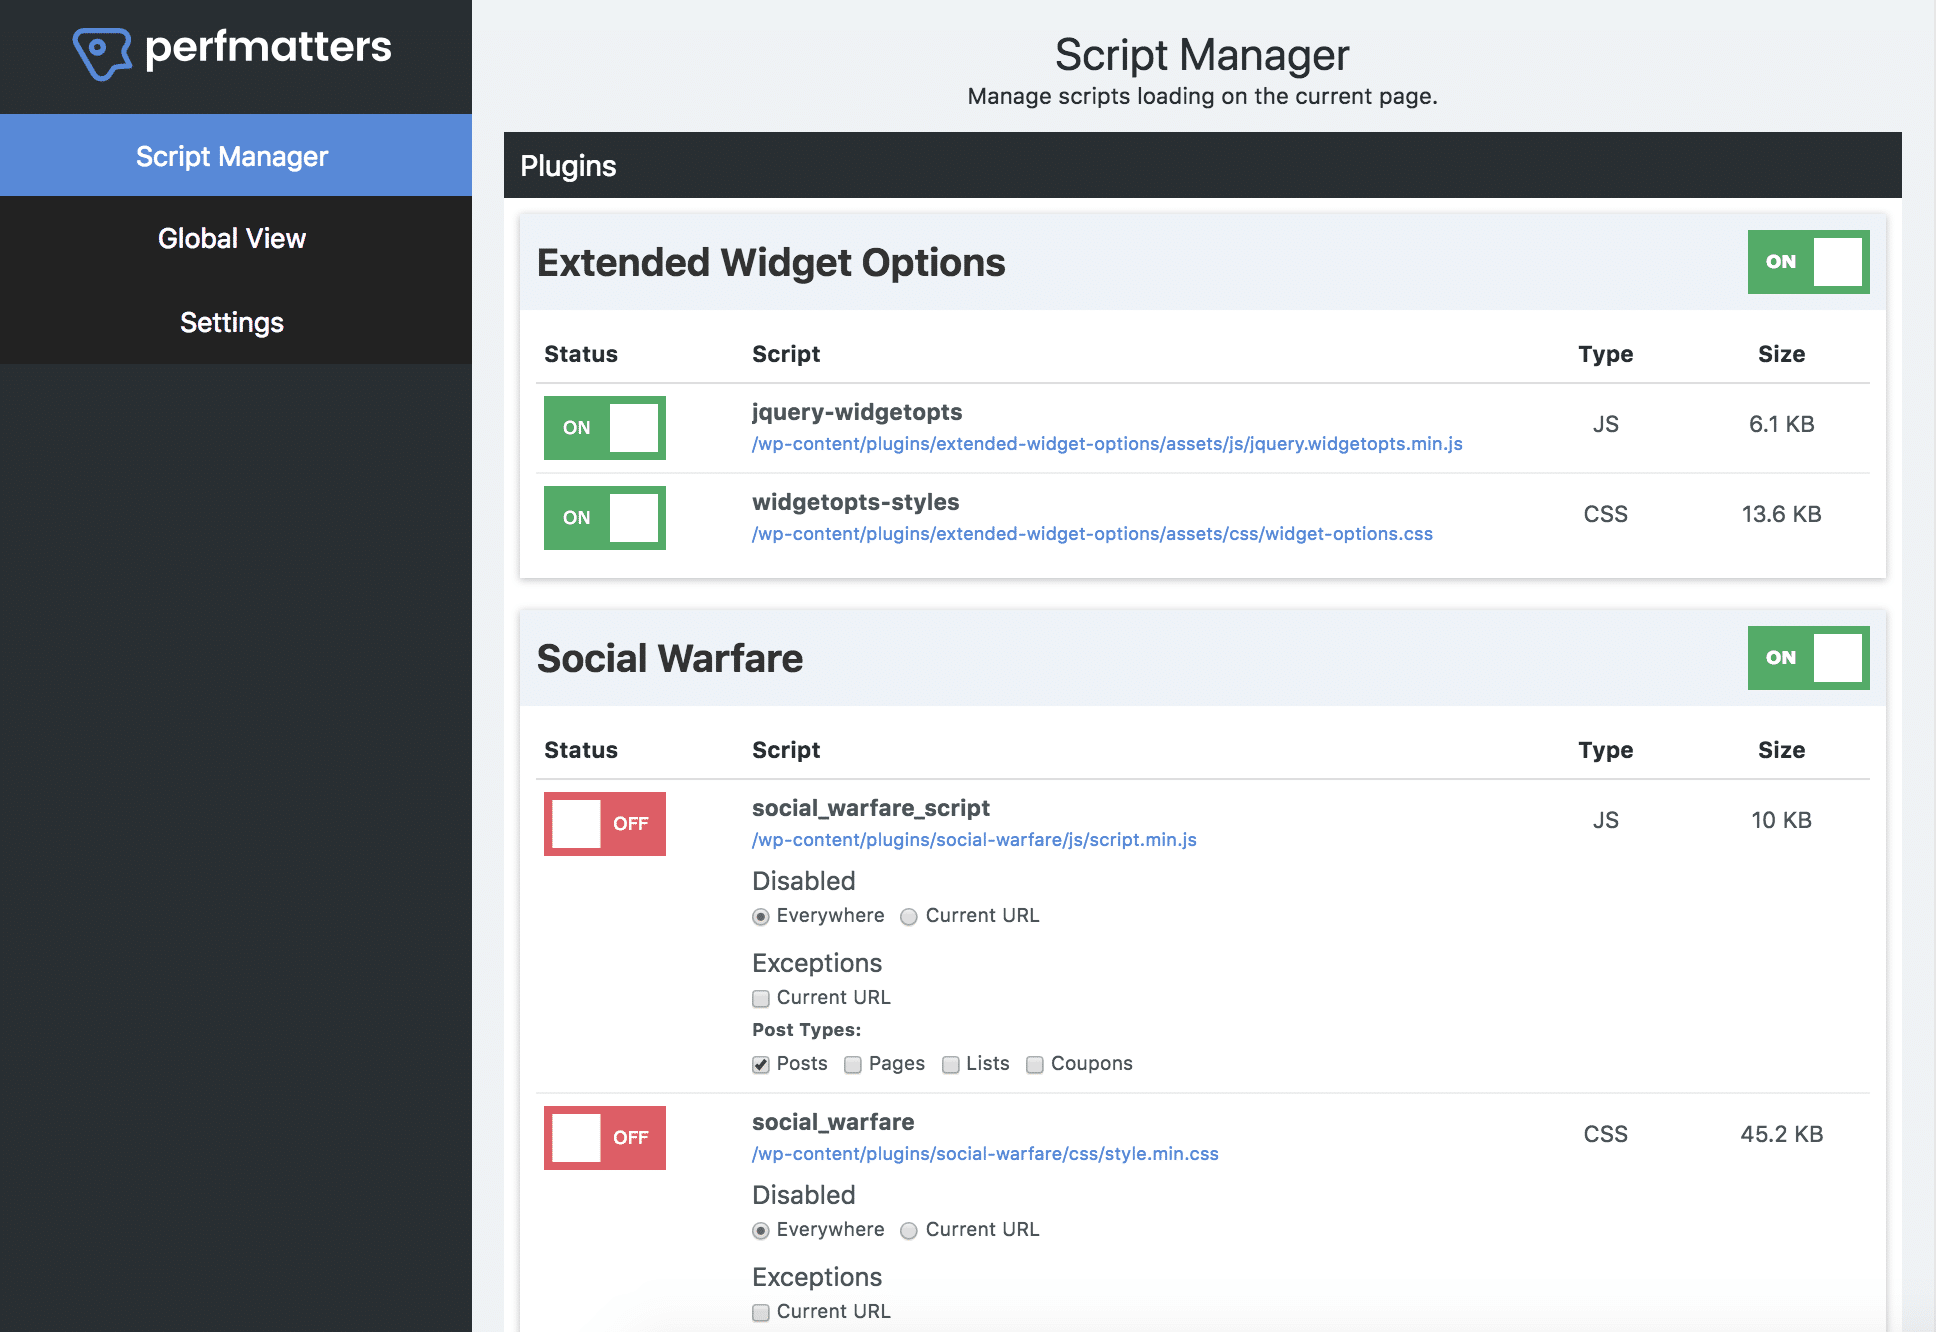
The plugin has a feature called the Script Manager, where everything is grouped together by the plugin or theme name. This makes it super easy to disable an entire plugin at once, or individual CSS and JavaScript files within it.
You can even disable scripts with regex. This is especially helpful for sites that have a more complex URL structure in place or dynamically generated pages.
This is very powerful and can drastically increase the speed on your WordPress sites (especially your homepage). A few examples of what this can be used for:
- Social media sharing plugins should only be loaded on your posts. You can easily disable it everywhere and load only on post types, or even custom post types.
- The popular Contact Form 7 plugin loads itself on every page and post. You can easily disable it everywhere with one click and enable only on your contact page.
- If you’ve upgraded to WordPress 5.0 but aren’t using the Gutenberg block editor, perhaps you’re still using the classic editor, there are two additional front-end scripts that are added site-wide which you can disable:
/wp-includes/css/dist/block-library/style.min.cssand/wp-includes/css/dist/block-library/theme.min.css
You can see from this review of perfmatters, it decreased their total load times by 20.2%. On their homepage alone they were able to reduce the number of HTTP requests from 46 down to 30! The page size also shrunk from 506.3 KB to 451.6 KB.

How to Track Performance: The Browser’s Dev Tools
A fundamental step on the highway to performance optimization is the load time measurement. We have a number of plugins and online tools we can use to track site performance, like Google Pagespeed Insights and Pingdom. But first and foremost, we can use the browser’s Dev Tools, which provide a lot of meaningful information.
Each browser inspector has a Network panel which displays a list of network requests and related information. Follow these links for detailed documentation:
- Firefox Dev Tools
- Chrome DevTools
- Microsoft Edge F12 Dev Tools
- Safari Web Inspector Guide
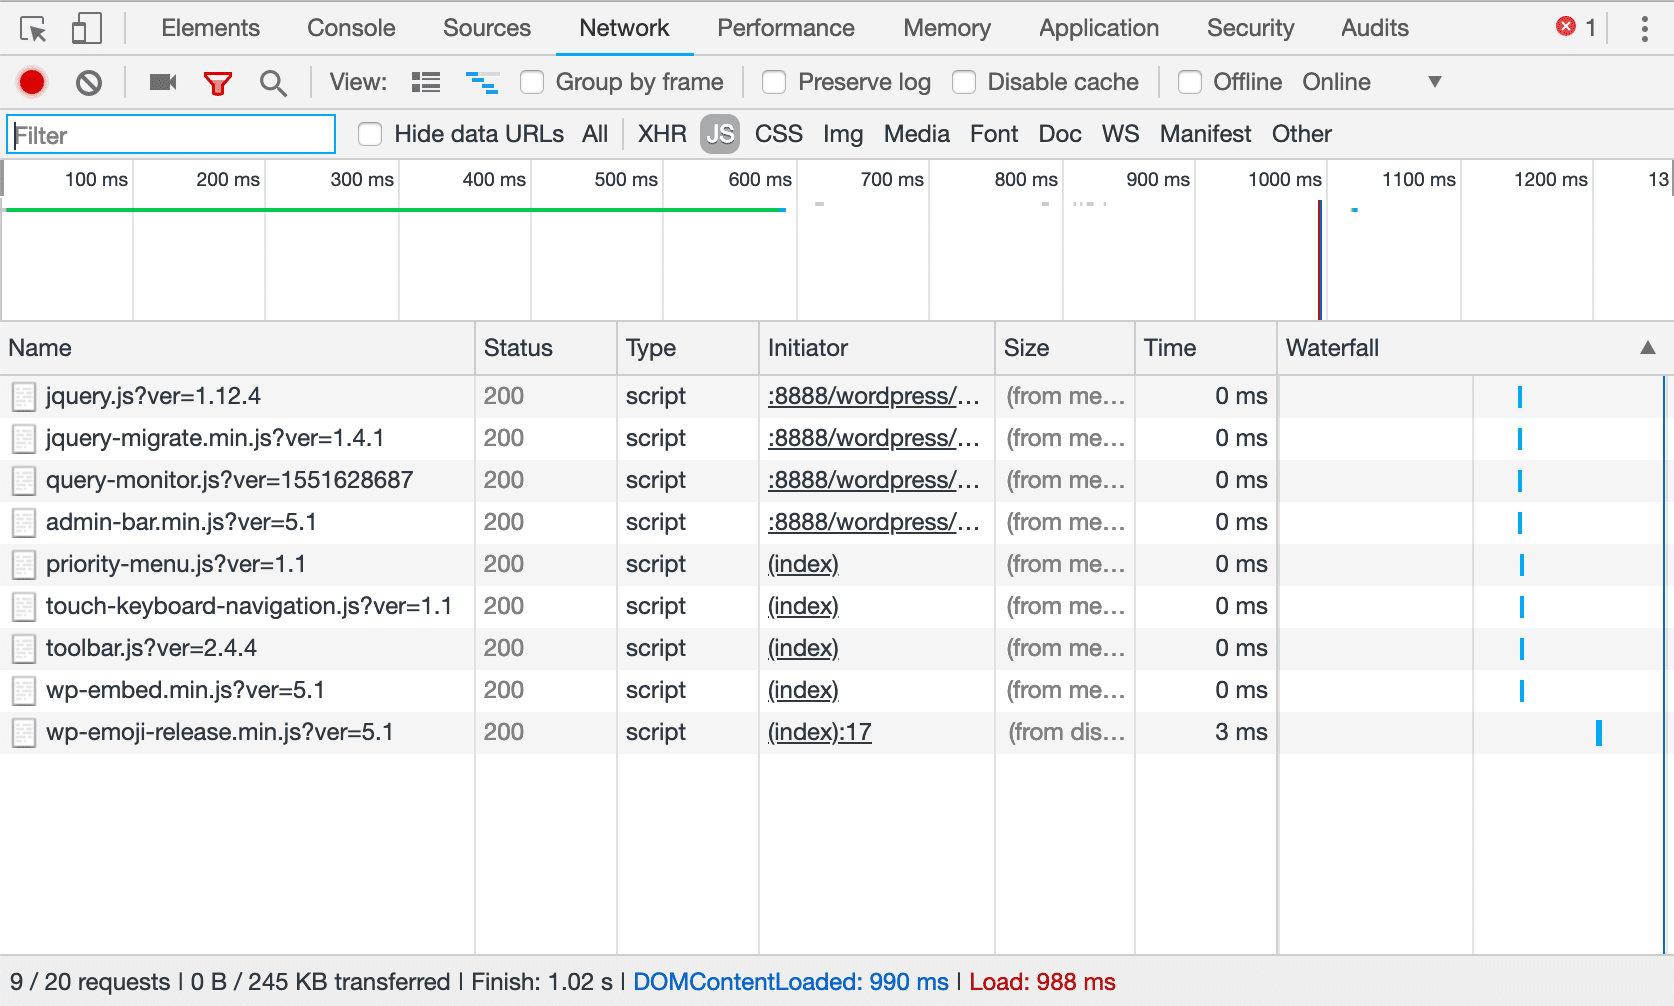
In a WordPress install with eighteen active plugins, we’ve repeatedly inspected a post page with Firefox Dev Tools. We’ve first measured page speed and listed requested resources before installing any filtering plugin. The following image shows the output of the performance analysis tool available in the Firefox Network monitor.
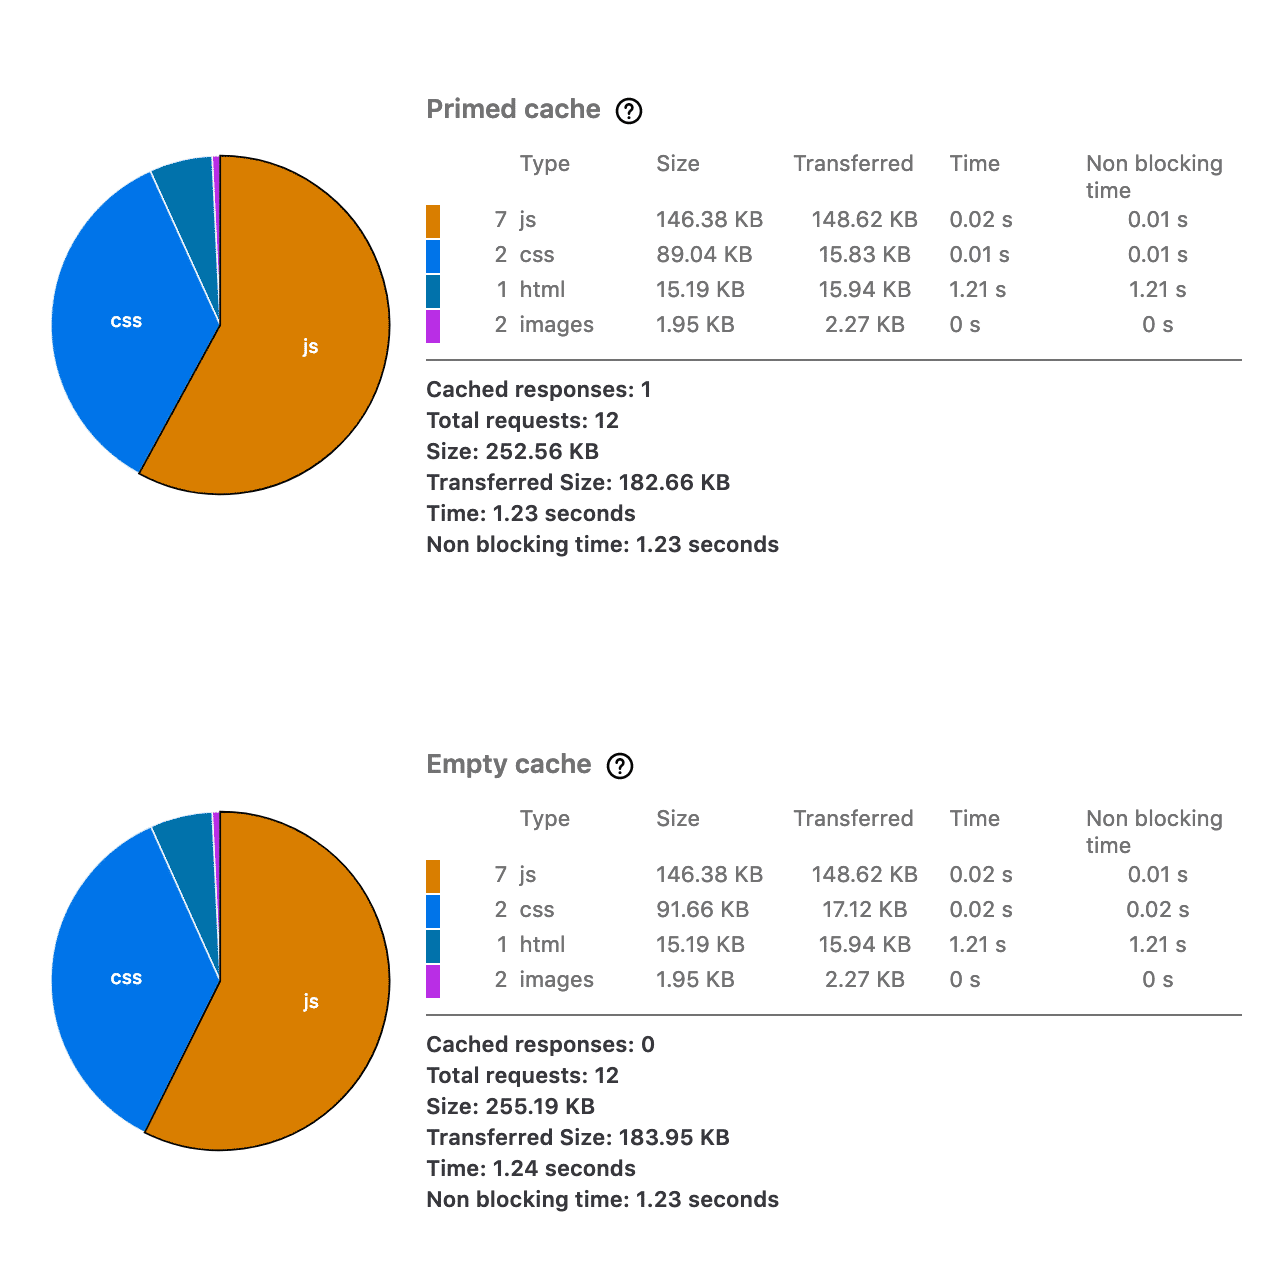
The Network monitor provides the following results (empty cache):
- size: 255.19 Kb
- load time: 1.24 seconds
- requests: 12
Following, we have installed the Plugin Organizer to prevent WordPress from running the CF7 plugin. The pie chart changes a bit.
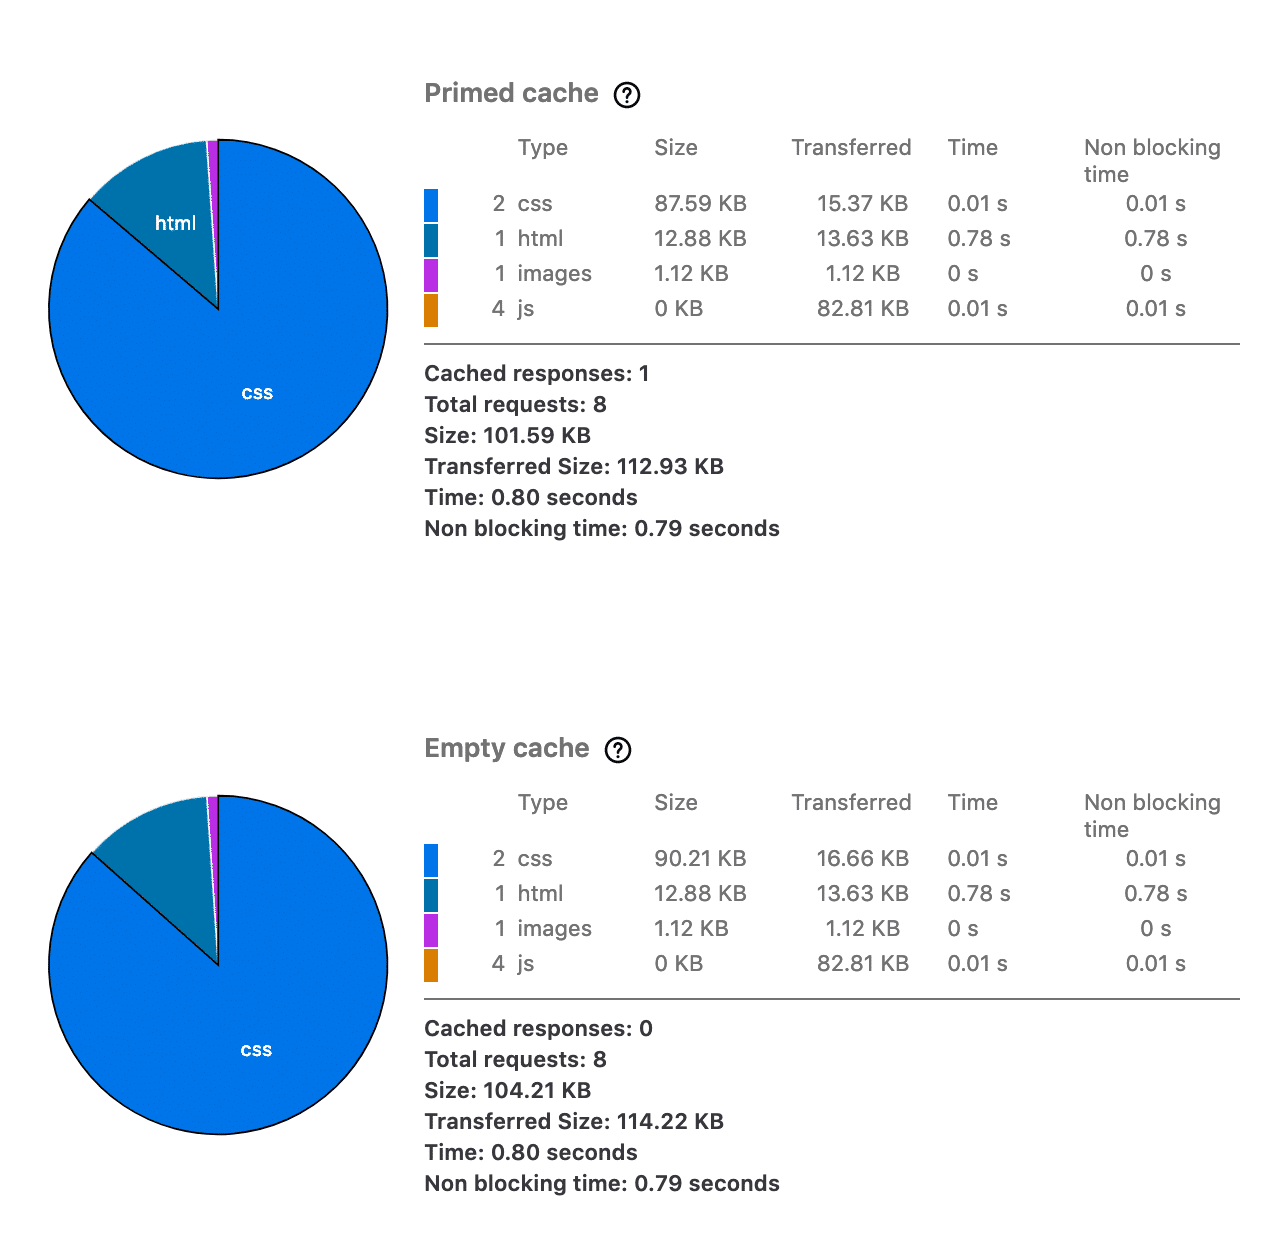
Now the page loads faster (empty cache):
- size: 104.21 Kb
- load time: 0.80 seconds
- requests: 8
Next, we’ve deactivated several unnecessary plugins, and the next image shows how much we’ve improved the page performance.
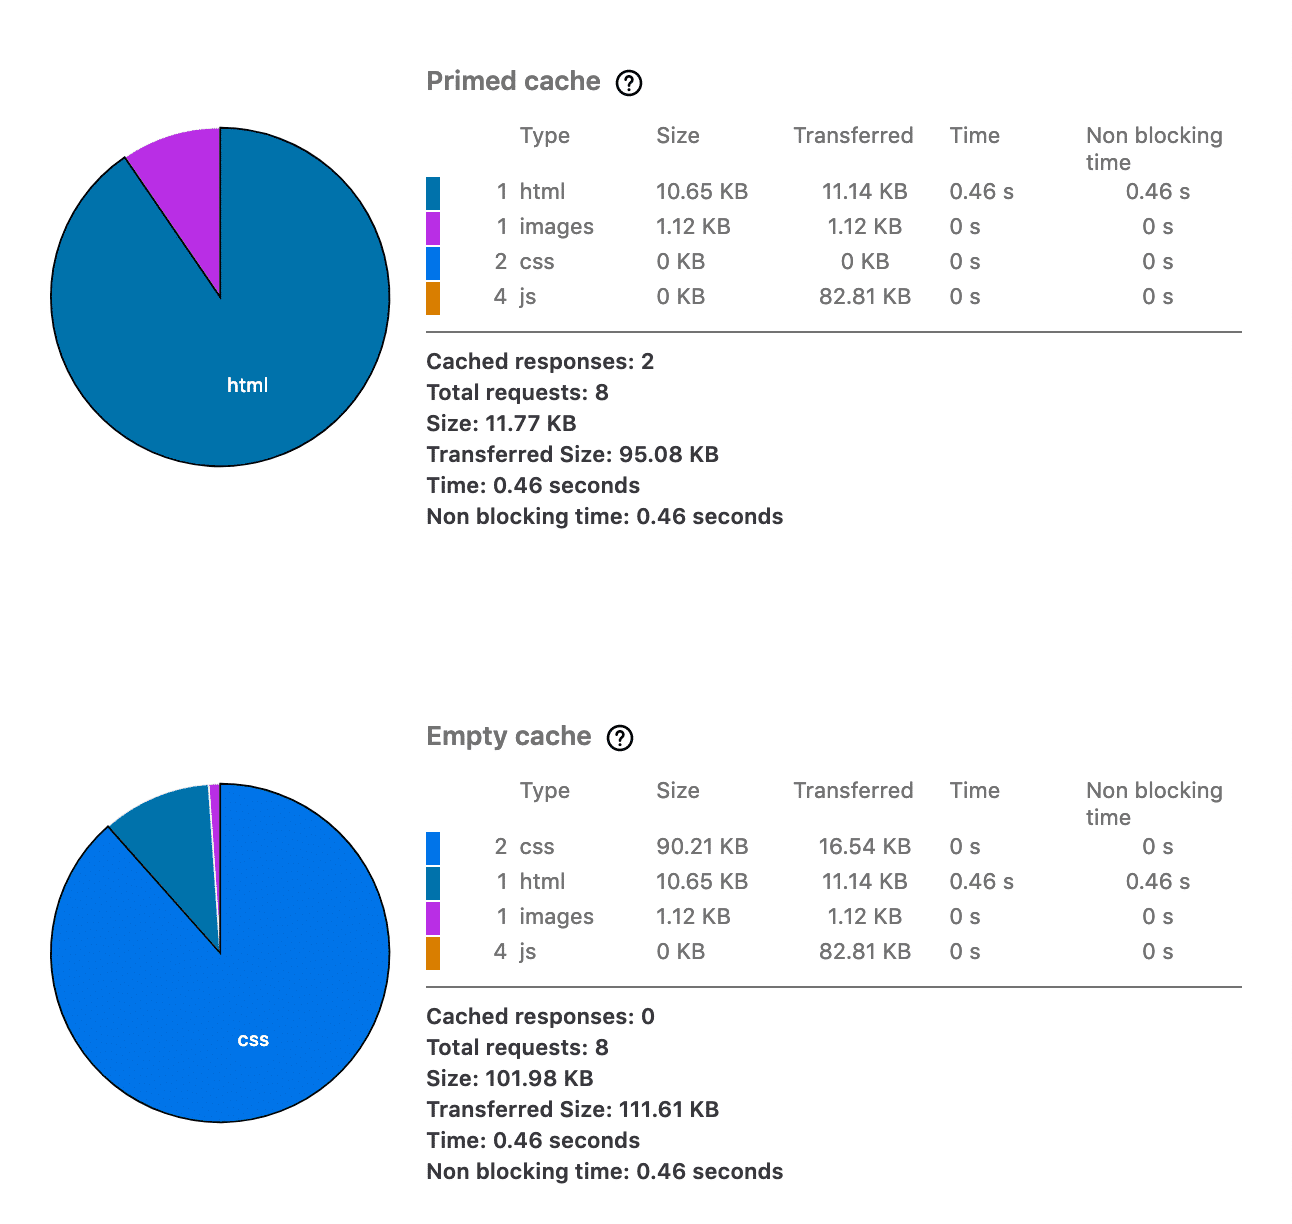
After disabling all unnecessary plugins, the empty browser cache of the Network monitor returns the following data:
- size: 101.98 Kb
- load time: 0.46 seconds
- requests: 8
We can compare the results of our tests. The resource size has been reduced by 60.04%, the load time was reduced from 1.24 seconds to 0.46 seconds, and the number of HTTP requests decreased from 12 to 8. This confirms that plugins can affect page performance, and that we can increase page speed by taking advantage of a plugin filter.
Summary
Whether you build your own scripts or install third-party tools, organizing and filtering plugins is something you should always consider when it comes to performance optimization. Remember, not all plugins are developed with performance in mind. Therefore, it can be wise to take some time and determine what plugin assets (CSS and JS) are loading and where.
But learning how to disable WordPress plugins is just one among many other techniques aimed to increase site speed. Here is a list of some other helpful guides and tutorials related to site performance:
Categories
Subscribe Now
10,000 successful online businessmen like to have our content directly delivered to their inbox. Subscribe to our newsletter!Archive Calendar
| Sat | Sun | Mon | Tue | Wed | Thu | Fri |
|---|---|---|---|---|---|---|
| 1 | 2 | 3 | 4 | 5 | 6 | |
| 7 | 8 | 9 | 10 | 11 | 12 | 13 |
| 14 | 15 | 16 | 17 | 18 | 19 | 20 |
| 21 | 22 | 23 | 24 | 25 | 26 | 27 |
| 28 | ||||||
Recent Articles
-

Posted on : Jul 25
-

Posted on : Jul 07
-

Posted on : Apr 07
-

Posted on : Mar 19
Optimized my.cnf configuration for MySQL 8 (on cPanel/WHM servers)
Tags
- layer 7
- tweak
- kill
- process
- sql
- Knowledge
- vpn
- seo vpn
- wireguard
- webmail
- ddos mitigation
- attack
- ddos
- DMARC
- server load
- Development
- nginx
- php-fpm
- cheap vpn
- Hosting Security
- xampp
- Plesk
- cpulimit
- VPS Hosting
- smtp
- smtp relay
- exim
- Comparison
- cpu
- WHM
- mariadb
- encryption
- sysstat
- optimize
- Link Building
- apache
- centos
- Small Business
- VPS
- Error
- SSD Hosting
- Networking
- optimization
- DNS
- mysql
- ubuntu
- Linux


