How to Use Google AdWords for Your Business (Beginner’s Guide)
- Category : Marketing
- Posted on : Sep 03, 2018
- Views : 2,435
- By : Odalis J.
Running an online business is no joke, especially when you have to compete with giants like Amazon that have an endless marketing budget fuelling their advertising. The race to reach the first page of Google search results is highly competitive. Trying to reach the first page, even with excellent SEO may easily take months or even a year.
This is where paid ads (PPC) come in. Google AdWords is Google’s advertising service that allows businesses to display their ads on Google’s search result pages. The ads usually appear at the top or bottom of a Google SERPs (search engine result pages).
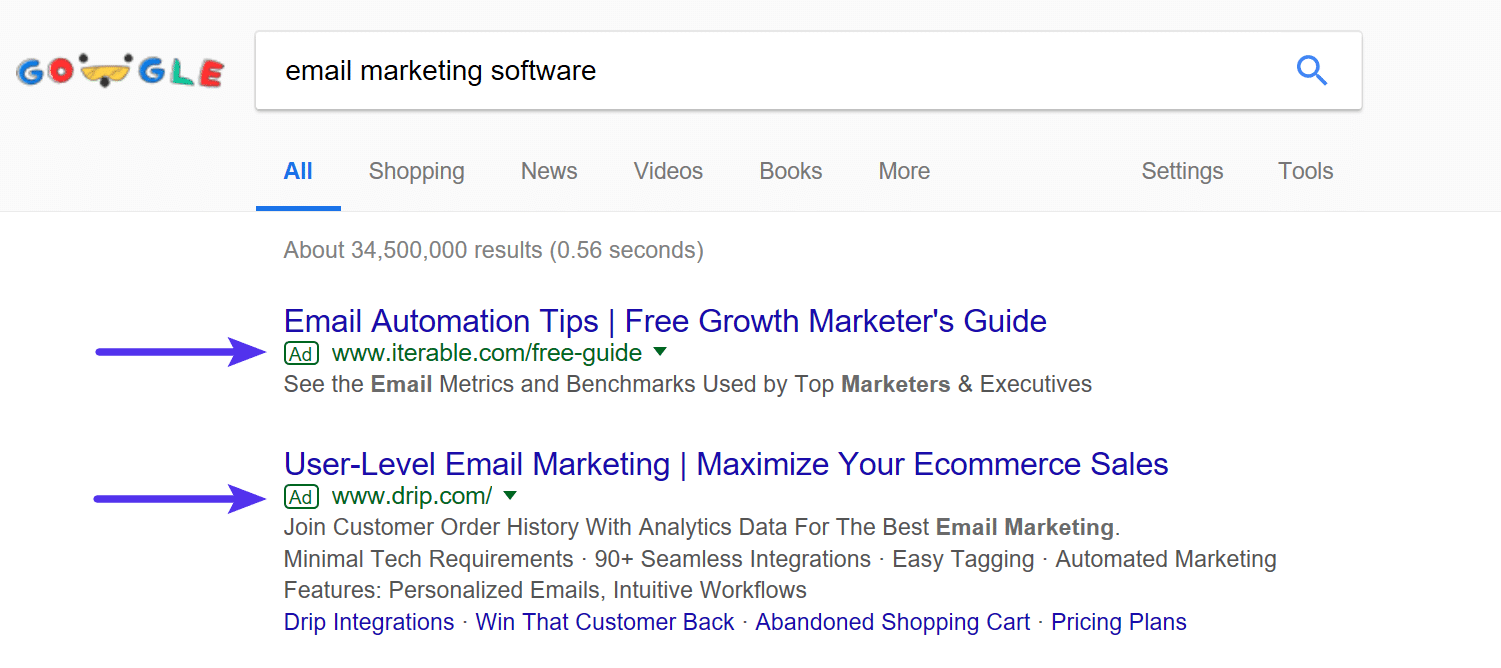
Using Google AdWords is a common and effective marketing strategy among businesses looking to get their first online customers. Today we’ll dive into some of the basics on how to use Google AdWords for your business.
Advantages of Using Google AdWords
Google AdWords is a powerful tool when it comes to advertising a business online. What makes it so great? Below are few of the advantages that businesses enjoy on Google’s paid marketing platform:
Precise Targeting
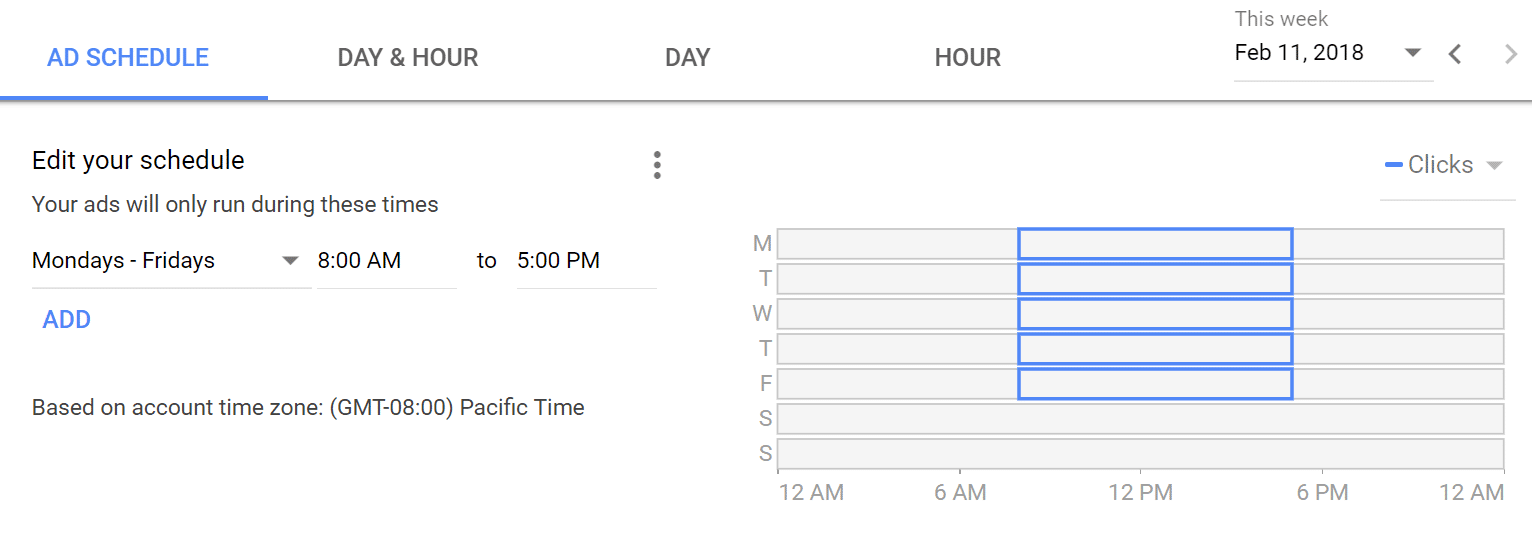
With Google’s many targeting options, business owners are able to ensure their ad is only displayed to potential customers. Business owners can filter their audience on the basis of geographical location, age, keywords and more. Additionally, they can also choose the time of day when their ads will be displayed to their targeted audience. A common example that a lot of businesses use is running ads only from Monday – Friday from 8 AM to 5 PM. This is due typically due to the fact that businesses are closed or are slower on the weekends. This can help maximize ad spend.
This is especially advantageous for local businesses. Studies show, 50% of mobile users that conducted a local search on their smartphone ended up visiting a store within a day, which gives local businesses an upper hand on catching the crowd’s attention by being on the top of SERPs.
Target Specific Devices
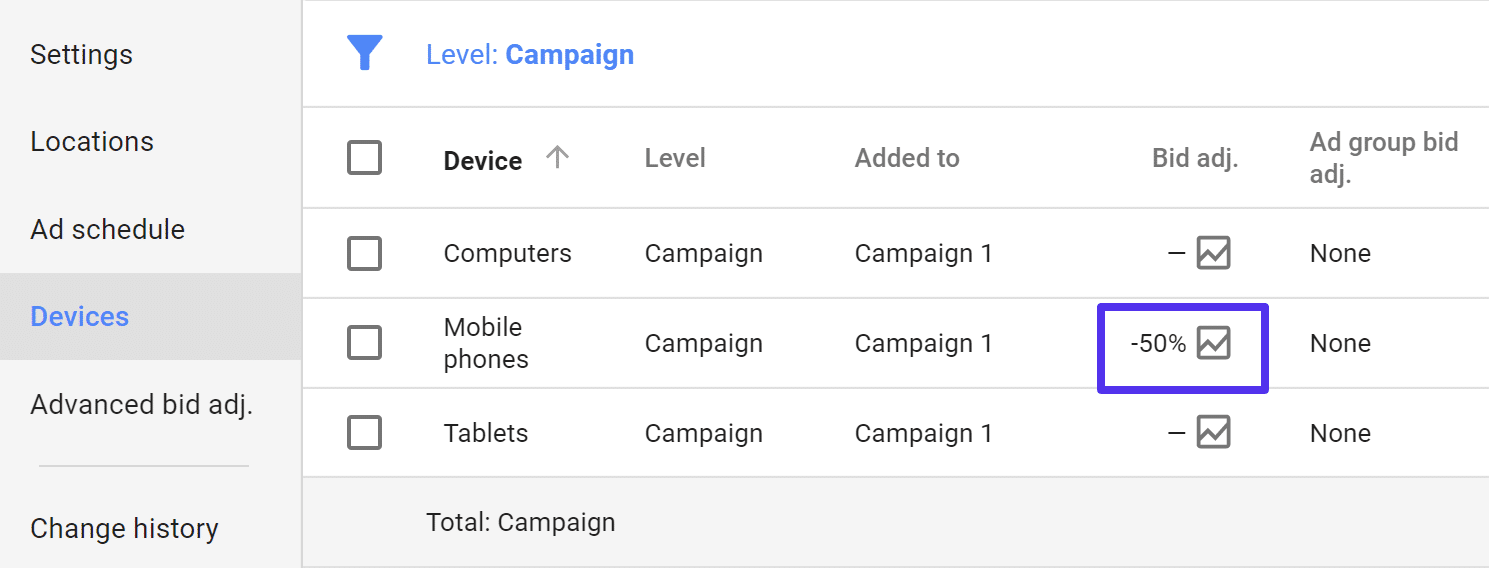
After a 2013 update, Google AdWords allows businesses choose the kind of devices their ads will be displayed on. For the search network, you can choose between desktops, tablets, and mobile devices. On the display network businesses can even drill down even further and target specific devices like iPhones or Windows. Bid adjustments allow automatically bidding higher or lower on devices that are more likely to convert on your site. Tip: Looking at conversion and ecommerce data in Analytics.
Pay Only For Results
This is arguably the most popular advantage of advertising on Google AdWords. With AdWords, businesses only pay for the clicks on their ads, instead of impressions. This is called a pay-per-click (PPC) advertising model. This way, businesses save money by only paying when a user has taken action to view their website.
Performance Tracking
Google AdWords allows businesses to track the performance of their ads. This means you can track the number of users that view and click your ad. Adwords also allows you to track the number of users that take the desired action after viewing your website.
According to Google’s Economic Impact report, businesses make an average of $2 for every dollar spend on AdWords. At a time like this, using Google AdWords as part of your online marketing strategy is bound to bring about positive results. However, that isn’t always true of every industry. The best way to discover if AdWords will be profitable for your business it to give it a try.
If you’re confused about how to go about setting up your account and how to use AdWords profitably, this guide is going to help you do just that. Read on.
Preparing for PPC
Pay Per Click advertising is a powerful tool, but only when it is used smartly. Before you can jump into the process of making your AdWords account, you must figure out your objectives. While “more sales” might sound like a great objective, online advertising will require you to be more specific.
It is highly unlikely that someone visiting your website for the first time will make a purchase. Online sales are more dependent on making and nurturing a relationship of trust with your consumer. For this reason, there can be a number of objectives for a business to use AdWords. Such as:
- Generating sales
- Registrations
- Email sign-ups
- Lead Generation
- Enhancing brand awareness and recall value
While it is perfectly fine to have more than one objective, keep in mind that you will have to run different campaigns to achieve different objectives (More on this later). Apart from identifying your objective, there is another very important prerequisite for advertising on AdWords, having a landing page.
Landing Page
A landing page is a URL or a webpage on which, a user “lands” when they click on your advertisement. A landing page is a standalone page, distinct from your main website, designed to focus on a specific objective. A great landing page is crucial to the success of your AdWords campaign. A well designed and optimized landing page will help convert visitors into leads, or even customers.
Keep the following things in mind while designing your landing page:
- Focused landing pages: Design individual landing pages for individual offers. A landing page that focuses on multiple objectives might end up confusing your visitors.
- Call to action: Do not forget to include and properly highlight the desired call to action button on your landing page.
- Mobile friendly: With the ever-increasing number of mobile users on the internet, it is crucial to ensure your landing page is mobile friendly.
- Deliver what you promise: Your landing page should deliver any promises made in your ad. For instance, if your ad talks about a discount, make sure the landing page features the said discount.
Check out more information on how to design high-converting landing pages.
By now, you must have a list of set objectives, and dedicated landing pages that serve to accomplish each one of them. It is now time to set up your Google AdWords account.
Setting up Google AdWords Account
Step 1: Sign Up
Simply go to the Google AdWords website and sign up with your Google account. If you do not have a Google account, you will have to create one. Worry not, it shouldn’t take more than a couple of minutes.
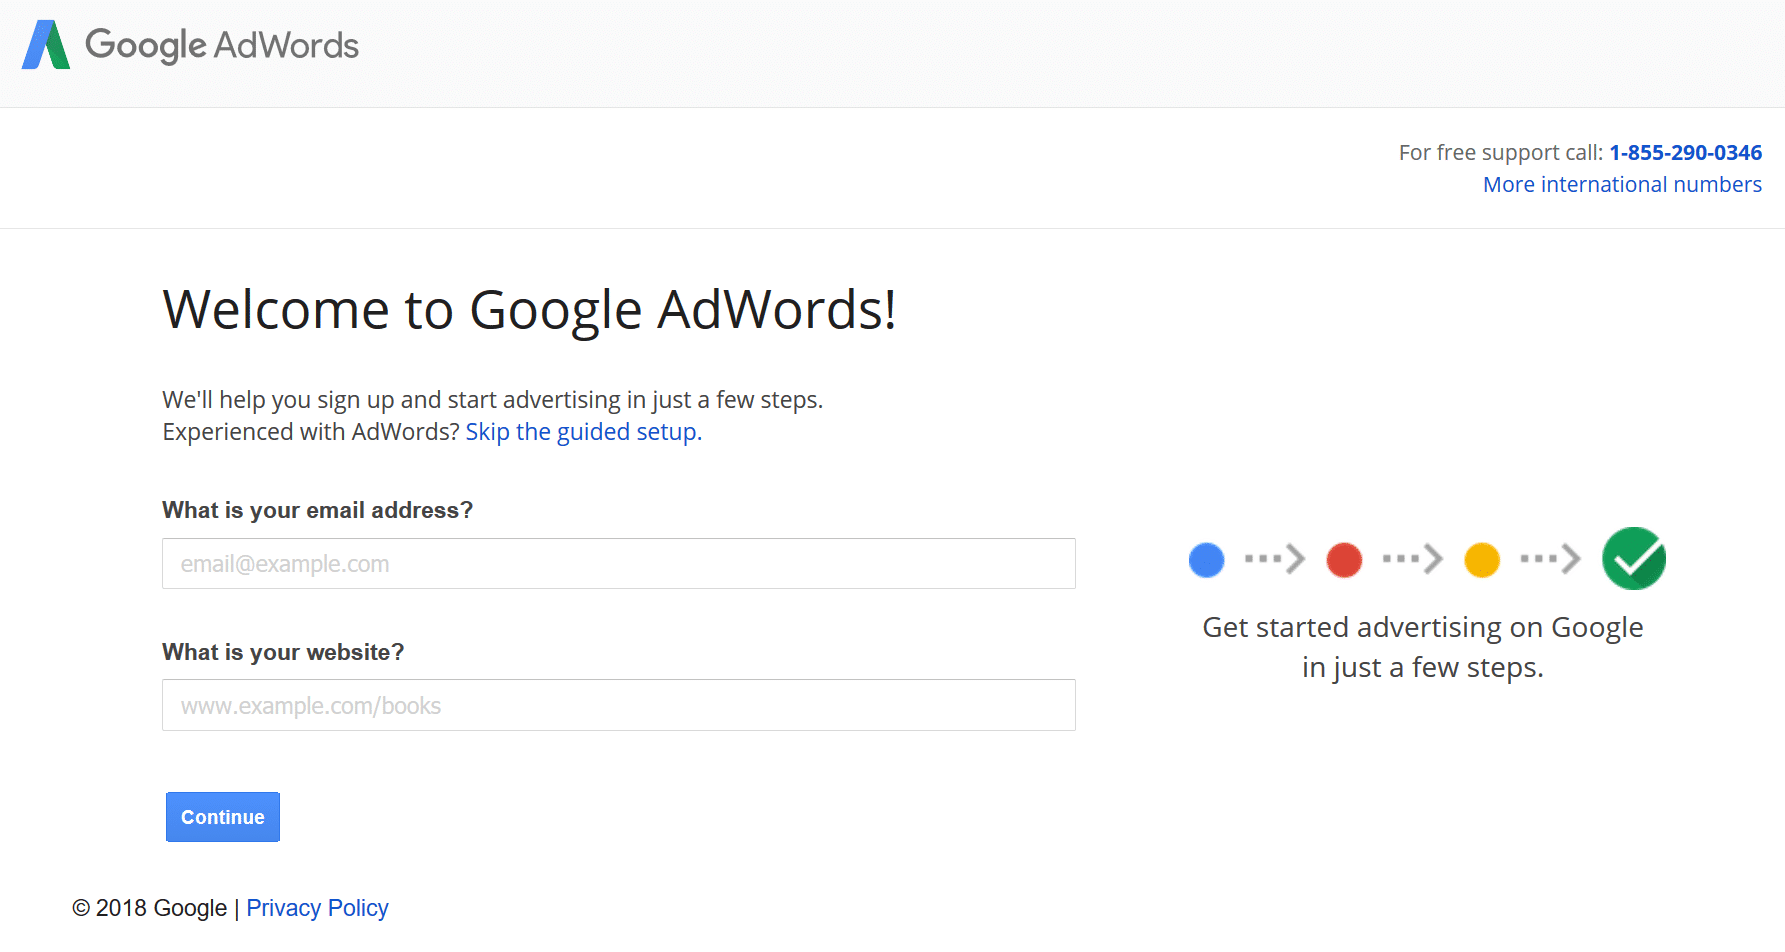
Once you have entered the necessary details, you will land on the following page to create your first campaign. Here you can choose your budget, target audience, set your bids, and write your ad copy.
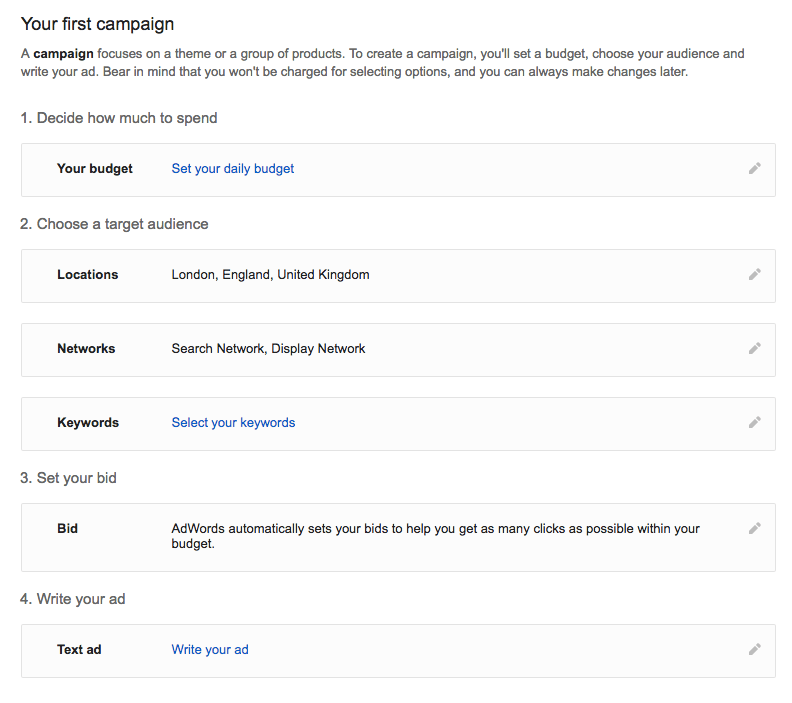
Step 2: Set Your Budget
As you can see, defining a budget is the foremost task on the list. Defining the daily budget will ensure you never cross your expenditure limits. The best way to figure your daily budget is to first understand the number of visitors that your landing page can convert into customers. If you’re just starting out, it’s OK to work with averages.
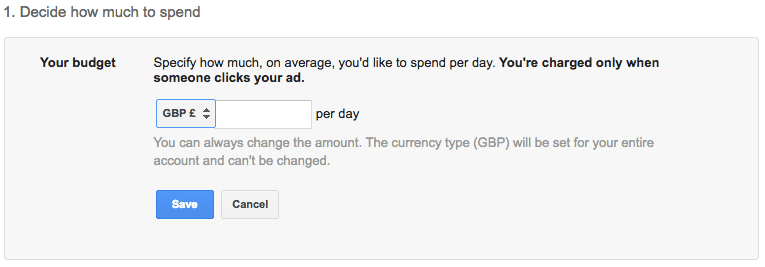
According to WordStream, the average rate of conversion across industries is 2.35%. This means, on an average, only 2.35% of users take the desired action after clicking on an advertisement. Taking in account the average conversion rate for your industry, you can figure out how much you are willing to spend for each visitor. This is also referred to as cost per acquisition (CPA).
After you have chosen your desired currency and budget, click on save and move on to the next step.
Step 3: Select Your Target Audience
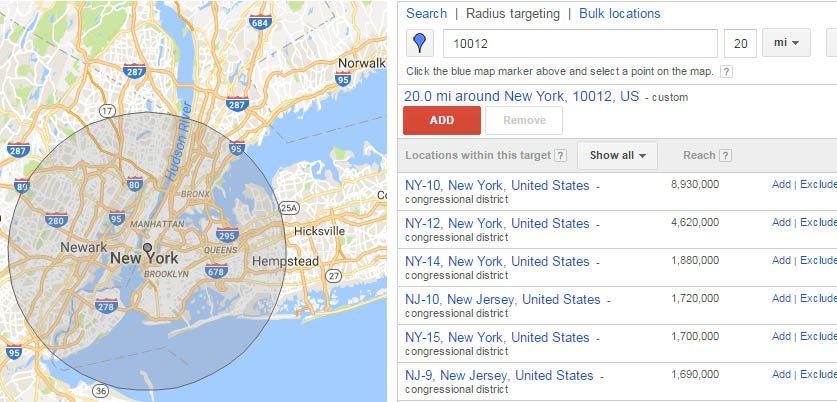
In this step, you get to specify the geographical location of your target audience. This feature ensures your ad is shown only to users that conduct a search using the keywords you’re bidding for (more on this later) and are present in the geographical location specified by you.
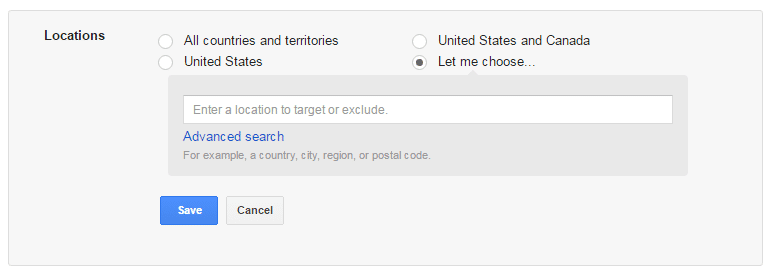
By using the advanced search option, you gain access to “radius targeting”. Radius targeting allows you to target a certain radius from your zip code. Depending upon the nature of your business, you might want to target entire countries, or only cities if you sell something locally. You can even set different bid adjustments per radius targets. For example, perhaps you want to bid higher within a 10-mile radius, but lower within a 30-mile radius.
Step 4: Choose A Network
The next step is to choose between Google’s Search Network and Display Network. The Search Network puts your ads on the google SERPs, while the Display Network will display your ad on any website that shows ads.
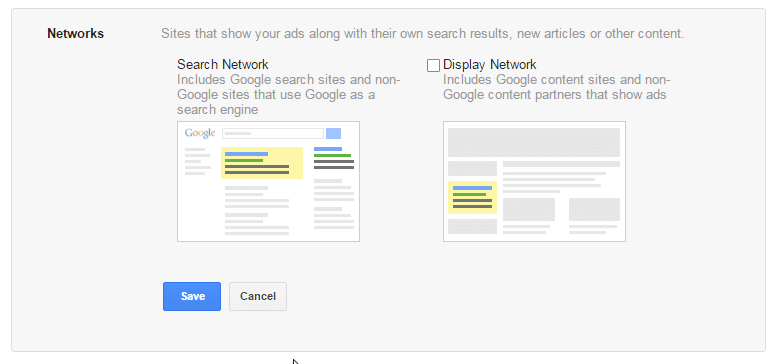
For beginners and small businesses, it is recommended to go with the Search Network as it shows your ads to users that are specifically searching for keywords relevant to your business. Display ads can be great for branding, retargeting, and generally have a lot lower CPC. But they are also not as query oriented.
Step 5: Choose Your Keywords
Keywords are the search terms or phrases a user enters into Google’s search box when they are conducting a search. Google lets you choose about 15-20 keywords that may trigger your ad to appear on the SERP. Don’t worry, you can always add more keywords later on.
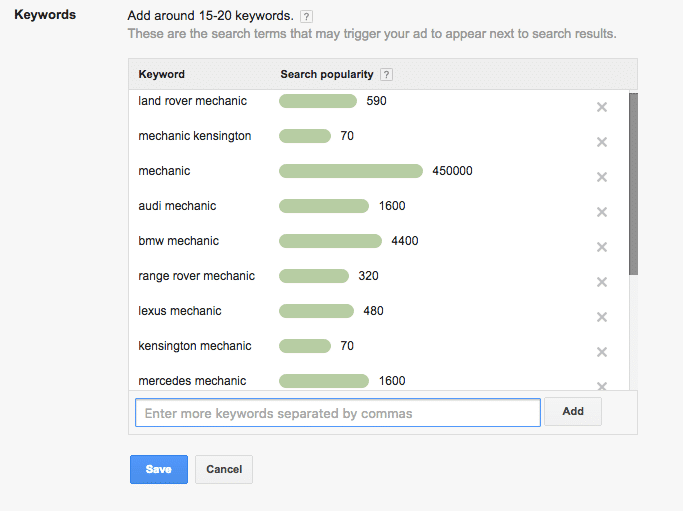
It’s recommended to choose a few keywords that you are sure of bringing results, instead of choosing 20 that you may find sort of relevant. Having said that, also pay attention to the search volumes of the keywords you choose. While it might seem tempting to choose a keyword that has the search volume of 450,000, doing so might not be the best idea.
As mentioned earlier, AdWords works on a bidding system. Keywords with high search volumes are usually extremely expensive to bid for. Choosing more keywords or choosing keywords with high search volume may turn out to be an expensive affair.
Keep your costs in check by choosing a few relevant keywords with moderate search volumes.
Keywords Types and Determining the Right “Keyword Match”
There are four keyword match types that determine how you want your ad to be displayed.
Broad match: The broad match is the default setting on AdWords. According to Google, it “allows your ad to show for searches on similar phrases and relevant variations, including synonyms, singular and plural forms, possible misspellings, stemmings.”
Broad match allows to you to reach the widest part of your audience. However, since broad match also shows your ads for synonyms and one part of your keywords, your ad may show up in a lot of irrelevant search results.
For instance, you might be targeting for “fine dining restaurants Manchester”, using broad match, your ad may also show in the results for “pizza in Manchester”.
Broad match modifier: The broad match modifier gives your more control. By simply adding a ‘+’ before a term, you can lock it into place. Only when a search term contains the phrases or words after the ‘+’, will your ad appear in the results.
For instance, if you bid for “+fine dining Manchester”, your result will never show for search terms like “pizza in Manchester”.
Phrase match: The phrase match offers even more control to business owners. When you choose phrase match, your ad is only displayed in results for search terms that are in the same order as your chosen keyword.
This means, if you choose “fine dining Manchester”, your ad will not show for “Manchester fine dining”. In order to specify phrase match, simply put your keywords between quotations.
Exact match: As the name suggests, this option will ensure your ad only appears when someone searches with a search term identical to your chosen keywords.
If you have chosen exact match and your keyword is “fine dining Manchester”, your ad will not even appear for search terms like “best fine dining restaurants in Manchester”.
To specify exact match, put brackets around your chosen keywords. (Example: [fine dining Manchester]) Tip: Using exact match can be a safe and slower way to scale our your campaigns when just starting out.
Negative keywords: Negative keywords are the terms help you ensure your ad is not shown to irrelevant audiences. This feature of AdWords comes in handy if you have a product/service that may share keywords with something that is not related.
Learn more about bidding by match types.
Step 6: Set Your Bid
As mentioned earlier, AdWords uses a bidding model. A bid is the amount of money you are willing to pay for every person that clicks on your ad. If you and your competitor are bidding for the same keyword, and you are willing to pay more per click, your ad will show higher than theirs.

As you can see, you are presented with two options. This first one lets Google set your bid amount to maximize the returns of your budget. If you would rather set your bid manually, we suggest doing some research using Google’s Keyword Planner.
If you’re just starting out you might want to start with automatic bids until you get familiar with the AdWords system. However, setting bids manually can usually be more cost-effective. Although sometimes this also requires additional ongoing maintenance.
Step 7: Write Your Ad
Writing your ad is arguably the most critical part of this process. We suggest you give it real thought and make it really compelling. Your message should clearly communicate your offer in such a way, that it convinces a user to click on your ad and visit your website. Here are a few tips to get you started:
Copywriting Best Practices
- Keep it short: There’s not a lot of space for text. So keep your message to the point.
- The headline is crucial: The headline of your ad is the first thing a user will encounter. Make sure it calls out to them and convinces them to click on the ad.
- Have a clear call to action: A clear call to action tells the user what you want them to do.
Anatomy of an ad:
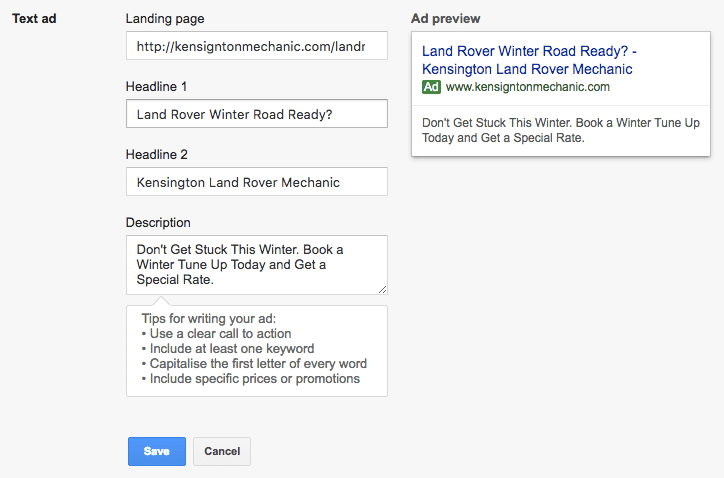
- Headlines: AdWords allows for up to two headlines to be included in an ad, each accommodating 30 characters. Make sure you use this limited space wisely. Additionally, it is recommended to include at least one of your chosen keywords in your headlines.
- Description: The description space is of 80 characters. Use it to convey your message to the user clearly. If possible, include any offers or discounts in this section to ensure the user clicks on your ad. Additionally, triple check for spelling and grammatical mistakes.
Step 8: Create your Ad
Once you are done writing your ad, click on the “save” button and continue to the last step of the process. In this section, Google will ask you about your business and payment information. You will be charged when you have exhausted your set budget, or 30 days later, whichever comes first.
Running Multiple Ads
As previously mentioned, it is advisable to run multiple ads to focus on various objectives. This can be easily done by running multiple campaigns at once. You can then find out which ones convert best for your business.
Each campaign will consist of several ad groups. Each ad group will consist of similar keywords, and the landing pages will have a similar theme. For instance, for an electronic appliance store, an ad group may be dedicated to televisions while another dedicated to refrigerators.
However, both the ad groups can be included in the same campaign. The ad groups in a single campaign will share the same budget and location and device targeting settings. If you are looking to target multiple locations or devices, you will have to create separate campaigns.
Campaign Evaluation
As mentioned earlier, one of the biggest advantages of using AdWords is its tracking capabilities. Using these, you will be able to determine if the ad you just created is performing well.
In order to do that, the first step is to select a conversion source. For small businesses the two most common conversion areas are:
- Websites: When a customer clicks on your ad, visits your landing page, and performs the desired action.
- Phones: When a mobile user calls you on the phone number mentioned in your ad or by clicking on the call button on your website or landing page.
The first thing you’ll want to do is set up a Google Analytics goal on your website and then follow these additional instructions for setting up Google AdWords conversion tracking (WordPress, Woocommerce, and Easy Digital Downloads).
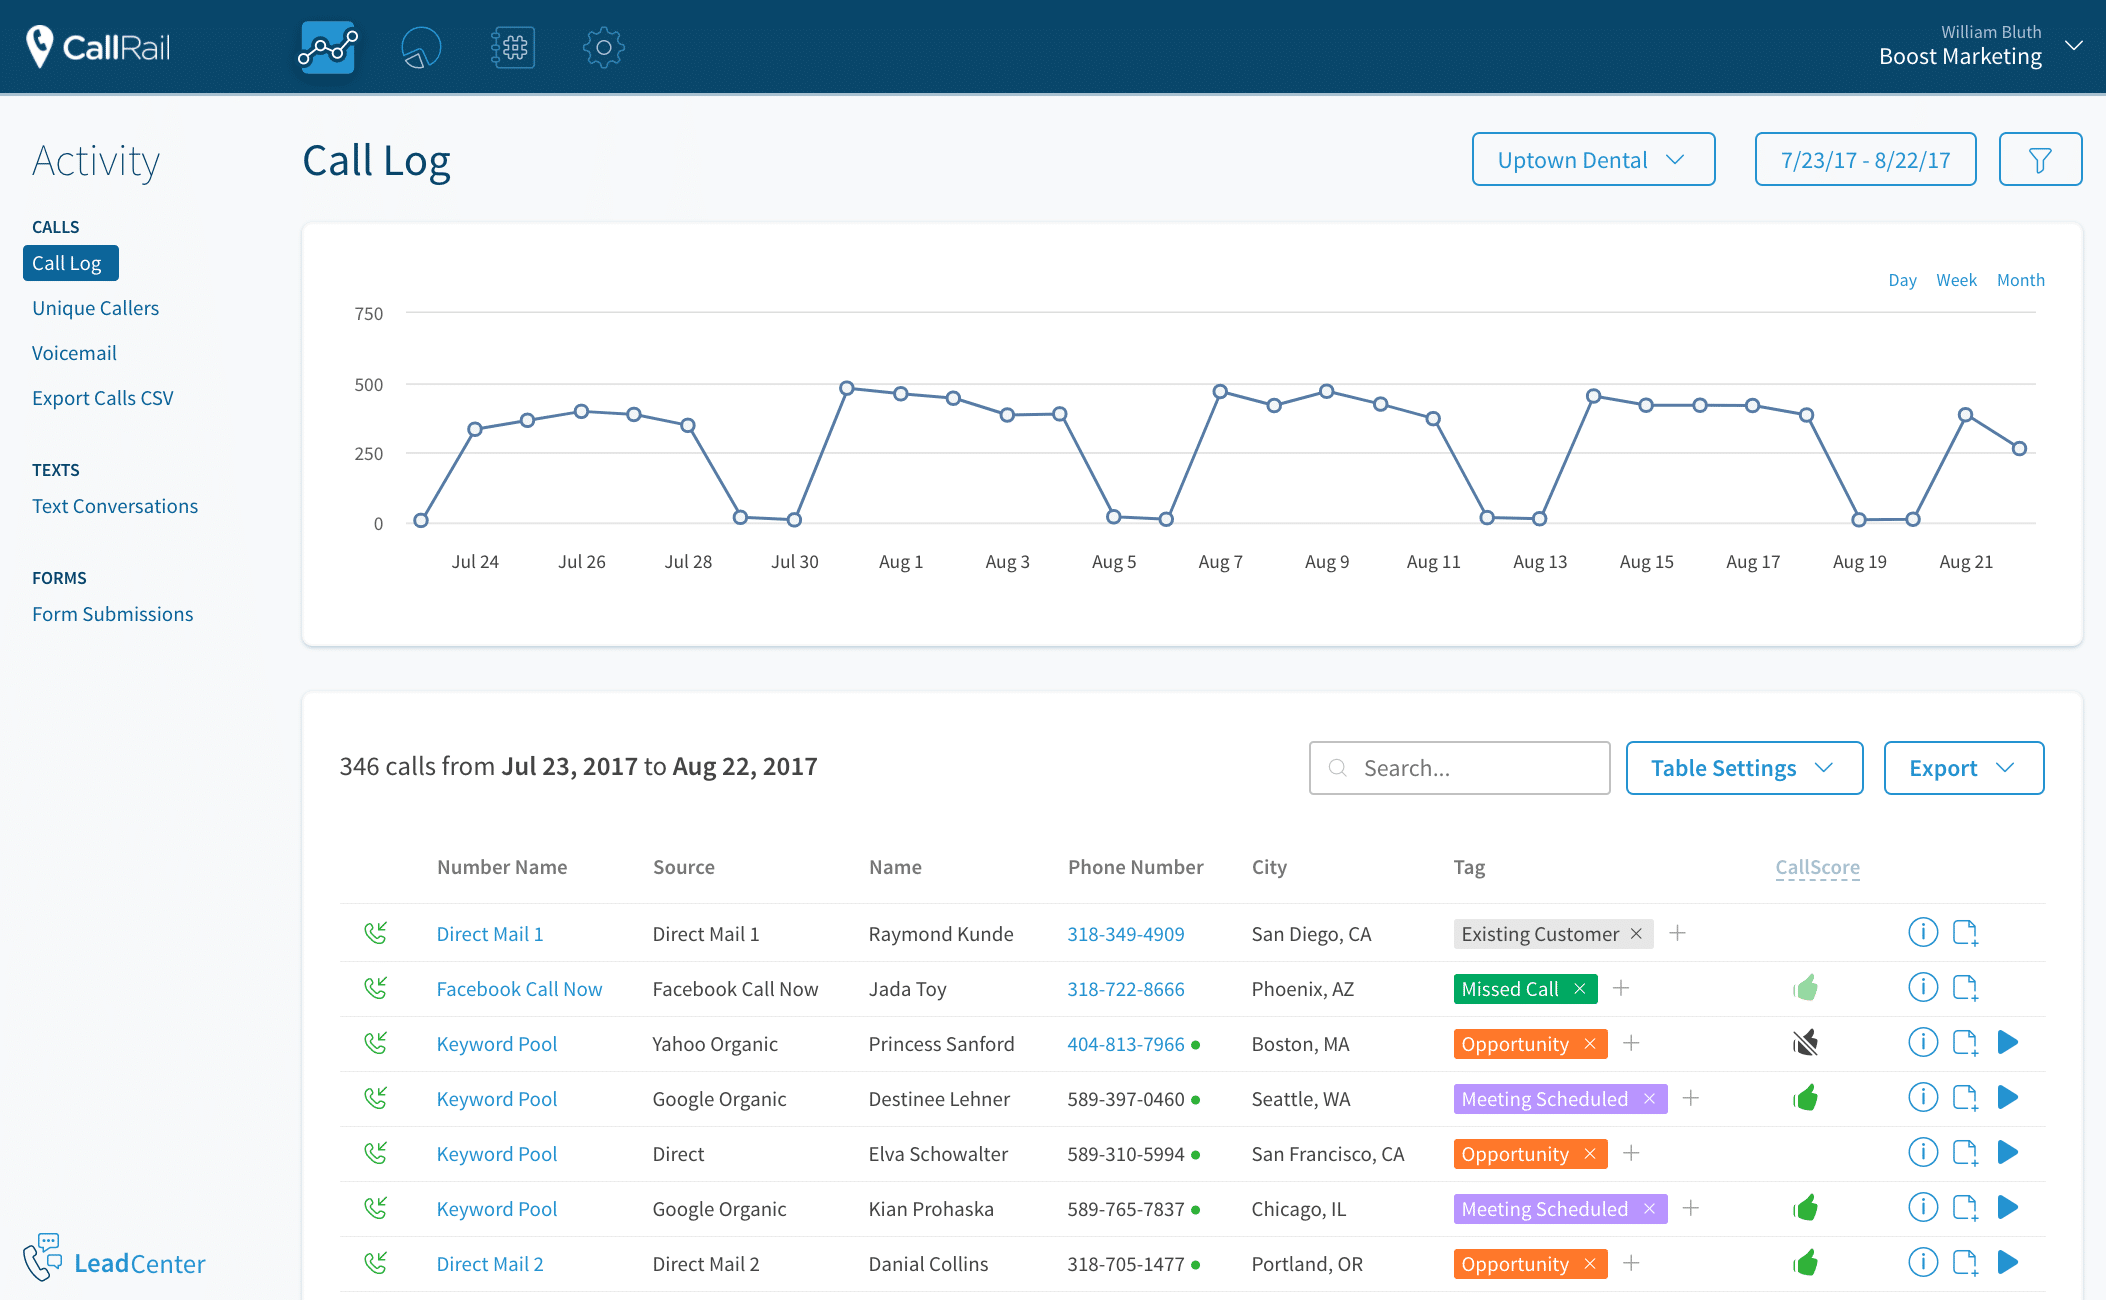
You can also track phone conversions on your ads. Tip: If your business relies heavily on phone calls, it’s also recommended to sign up for a third-party call reporting software such as CallRail. This has an easy integration with WordPress and Google AdWords.
Google’s Quality Score
Google also tracks how your ads are performing, and uses this information to determine where your ad will show on the search result page. Using the following factors as reference, Google assigns a Quality Score (QS) to each of your keywords:
- Landing page relevance: The relevance of the keyword to the content present on your landing page.
- Expected click-through-ratio: The likeliness of a user clicking on your ad after searching for the keyword.
- Ad relevance: The relevance of your ad to the keyword.
Check the quality score of your keywords by adding the “quality score” column under the keywords tab of your AdWords account.

The quality score not only helps determine the positioning of your ad, it also affects the bidding process and what you pay per click. To determine the position of your ad, Google will multiple the bid amount with your quality score. For instance, for a certain keyword, if your quality score is 0.7, and you make a $1 bid, your ad will be placed below your competitor whose quality score is 0.4 and bid is $2.
A 7/10 Quality Score is the recommended number and is sufficient. Going above 7 is great but not always achievable and may not be worth the effort. Anything below 7 is a sign that something is wrong and should be worked on. – Tenscores
Summary
Google AdWords is an extremely powerful tool when it comes to acquiring new customers for small businesses. However, if not used smartly, the platform can cost you real advertising money, without bringing in a respectable ROI.
Apart from using the intelligence you have gained through this blog post, the key to success lies in constantly testing your ads and optimizing them for better performance.
Categories
Subscribe Now
10,000 successful online businessmen like to have our content directly delivered to their inbox. Subscribe to our newsletter!Archive Calendar
| Sat | Sun | Mon | Tue | Wed | Thu | Fri |
|---|---|---|---|---|---|---|
| 1 | 2 | 3 | 4 | 5 | 6 | |
| 7 | 8 | 9 | 10 | 11 | 12 | 13 |
| 14 | 15 | 16 | 17 | 18 | 19 | 20 |
| 21 | 22 | 23 | 24 | 25 | 26 | 27 |
| 28 | ||||||
Recent Articles
-

Posted on : Jul 25
-

Posted on : Jul 07
-

Posted on : Apr 07
-

Posted on : Mar 19
Optimized my.cnf configuration for MySQL 8 (on cPanel/WHM servers)
Tags
- layer 7
- tweak
- kill
- process
- sql
- Knowledge
- vpn
- seo vpn
- wireguard
- webmail
- ddos mitigation
- attack
- ddos
- DMARC
- server load
- Development
- nginx
- php-fpm
- cheap vpn
- Hosting Security
- xampp
- Plesk
- cpulimit
- VPS Hosting
- smtp
- smtp relay
- exim
- Comparison
- cpu
- WHM
- mariadb
- encryption
- sysstat
- optimize
- Link Building
- apache
- centos
- Small Business
- VPS
- Error
- SSD Hosting
- Networking
- optimization
- DNS
- mysql
- ubuntu
- Linux


