An Introduction to a WordPress Multisite Setup
- Category : WordPress
- Posted on : Aug 08, 2018
- Views : 1,951
- By : Xavier N.
WordPress Multisite is a collection of independent websites sharing the same WordPress installation. The sites in the network are virtual sites, meaning that they do not have their own directory on the server, although they do have separate directories for media uploads and separate tables in the database.
In this post, I will introduce you to WordPress Multisite. It will be a basic user guide aiming to point out the pros and cons of Multisite vs single site installations, and to show you how to turn a single WordPress site into a Multisite network.
First, I will try to give you an idea of the many reasons you may have to install a network, and conversely of the many factors that could prevent you from installing a Multisite. Following, I will provide an overview of the available types of networks, I will describe the main characteristics of each type, and the system requirements that could force you to choose a type instead of another. Finally, we will dive deep into the installation process, and I will show you how straightforward it is migrating from a single WordPress installation to a Network of sites.
Notice: chances are that, after reading this post, you will switch from your single WordPress install to a Multisite install.
Forewords: Pros and Cons of WordPress Multisite
You might have good reasons to migrate from a single site to a Multisite installation. First, a Multisite allows you to build a network of independent websites, and could give the site users the possibility of joining the network by creating their own blogs on demand, just like WordPress.com users do.
You could think this service not to be in your business, and nevertheless, you may decide to switch to WordPress Multisite to save time and work. With a Multisite, you can set up a number (even a huge number) of websites and manage them from a single WordPress installation. In a Multisite, you’ll need to update core, themes, and plugins only once, because all sites in the network share the same installation.
A Multisite may save you a lot of time and definitely increase efficiency in your work.
Finally, if you’d need to present living examples of your work, you may switch to Multisite and activate one sub-site for any project (thanks to Rachel for this suggestion). This practice would help you to improve your professional image, provides a high-quality service to your clients, and helps you to keep your work well organized.
Of course, if you are a Host SEO customer, this point will not be relevant to you, since Host SEO offers staging environments that allow you to create test sites you can show to your customers before pushing staging to live.
Actually, switching to Multisite is not always possible. Our first and most important consideration is related to security: if your website should be hacked, the whole network would be compromised. If you decide to switch to Multisite, consider the opportunity to spend much time and resources to improve the installation security.
Useful reading: Recommended WordPress Multisite Plugins (Migrations and Backups)
Multisite is not an option when you need to share information between sub-sites. If you’d want to build a network of interconnected websites sharing users or data, you may consider to install a single WordPress website, and divide it into sections instead of a collection of separated sub-sites.
Moreover, there are a lot of other reasons that could prevent you from installing a Multisite. Some of these reasons depend on your client’s requests and needs, others are related to system requirements and server settings. Sometimes you can overcome technical limitations with the help of your hosting provider, but sometimes you should definitely turn to a more advanced hosting service.
SubDomains and SubFolders
Depending on the way it handles URLs, Multisite provides two different network types:
- Domain-based networks (SubDomains)
- Path-based networks (SubFolders)
A domain-based network uses URLs like http://mysite.network.com. These domain names could be properly configured in several ways. The Codex suggests one of the following:
- Configuring wildcard subdomains
- Configuring virtual hosts
- Creating addon domains or subdomains in the web hosting control panel
A path-based network uses URLs like http://network.com/mysite. This type of network requires Pretty Permalinks enabled to work properly. Whichever the type of network you’re planning to install, you can map external domains to existing sub-sites. Starting from WordPress 4.5, domain mapping is a core feature in WordPress Multisite, and we don’t need anymore a third party plugin like WordPress MU Domain Mapping. You can read more on Multisite domain mapping here on Host SEO blog (How to Setup WordPress Multisite Domain Mapping).
Once you’ve decided which type of Multisite to install, you should prepare the existing WordPress installation to become a network:
- Update the existing install and execute a complete back-up of files and database.
- Check if Pretty Permalinks work properly.
- Deactivate all active plugins. You will reactivate them later.
- If you’re planning to run WordPress out of its own directory, configure your installation before activating Multisite.
Finally, we can begin with the installation process.
Installing the Network
Before we can install WordPress Multisite, we have to enable the Network setup functionality. To accomplish this task, we just need to define the WP_ALLOW_MULTISITE constant in wp-config.php:
/* Multisite */
define( 'WP_ALLOW_MULTISITE', true );
This code must be added above the following commented line:
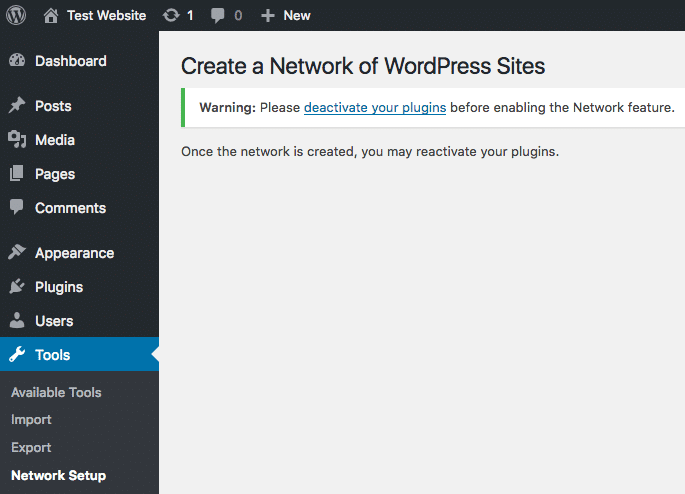
/* That's all, stop editing! Happy blogging. */Update wp-config.php and refresh the page: the Network setup menu item will appear under Tools menu. If WordPress would remind you to disable all active plugins, deactivate them, then get back to the Network setup admin page.
Now we have to choose the type of network we’re going to install between domain-based and path-based options.
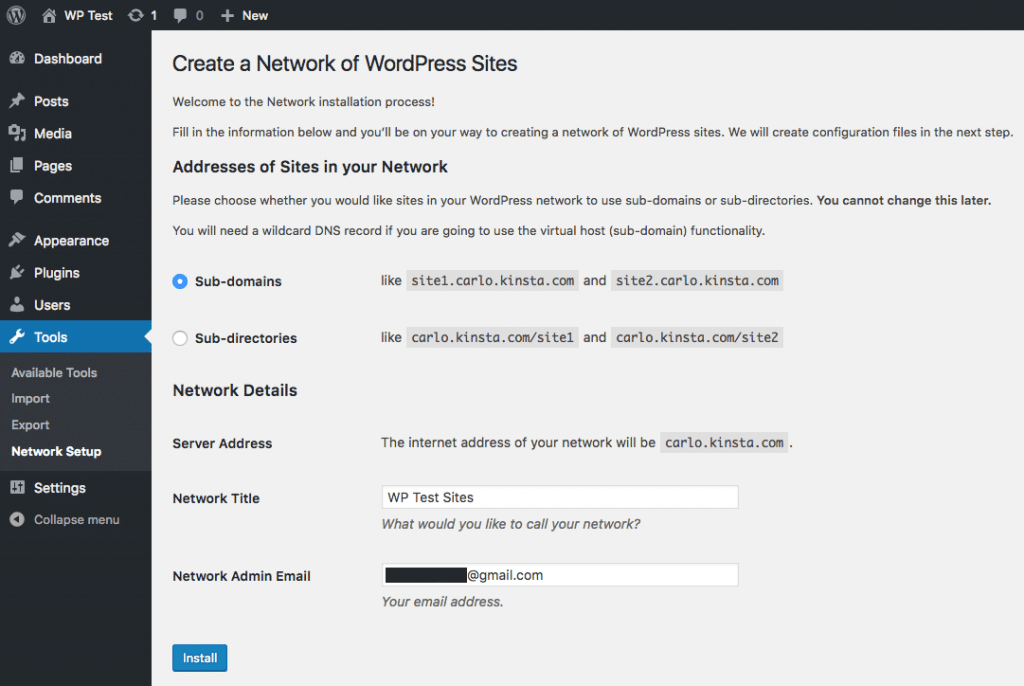
In order to avoid conflicts between the URLs of the original site pages and the URLs of the new sites of the Network, at this moment we will not be allowed to create a subdirectory-based network on those installs that are older than one month. Anyway, as I will explain in a moment, you can manually edit wp-config.php later to switch to a SubDomain Network.
This page displays the Server address, and two form fields whose values set the Network title and the Network admin email.
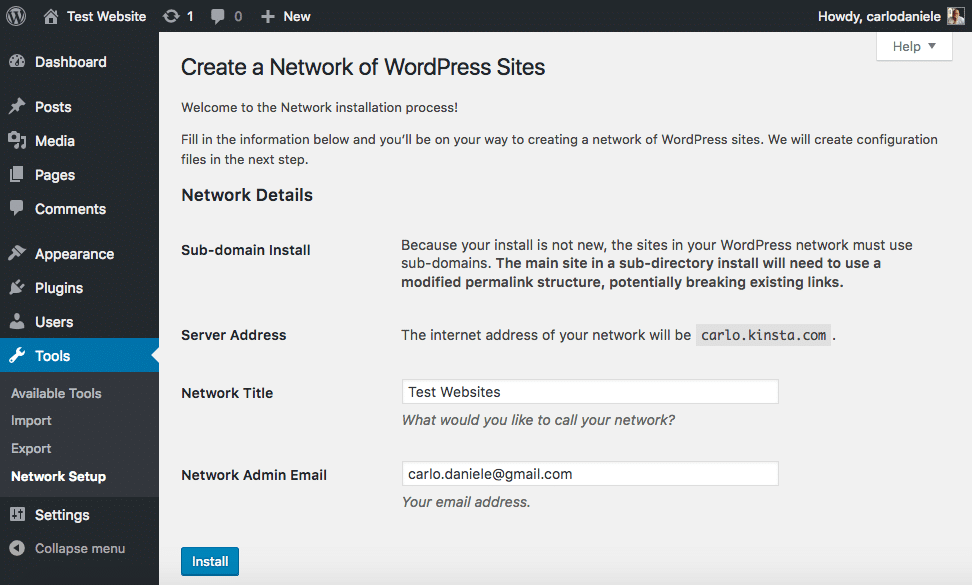
Next, back-up the existing wp-config.php file and run the Network setup.
In the succeeding page, WordPress provides detailed instructions on the changes to do in the configuration files. In wp-config.php file define the following constants:
define( 'MULTISITE', true );
define( 'SUBDOMAIN_INSTALL', true );
define( 'DOMAIN_CURRENT_SITE', 'carlo.centriohost.com' );
define( 'PATH_CURRENT_SITE', '/' );
define( 'SITE_ID_CURRENT_SITE', 1 );
define( 'BLOG_ID_CURRENT_SITE', 1 );
Define SUBDOMAIN_INSTALL to true if you’re installing a domain-based network, to false if you’re installing a path-based network. You could change the network typelater, although WordPress warns that it won’t be possible.
Note: in order to avoid conflicts between an existing post or page slug and a website’s path, WordPress won’t allow you to install a path-based network in installations older than one month. Anyway, you could install a domain-based network, then switch to a path-based network later by changing the value of SUBDOMAIN_INSTALL in wp-config.php.
Apache users should replace the existing .htaccess directives. The new file will be a bit different between SubFolder and SubDomain installs. The following example shows the .htaccess file of a SubFolder install:
RewriteEngine On
RewriteBase /
RewriteRule ^index.php$ - [L]

# add a trailing slash to /wp-admin
RewriteRule ^([_0-9a-zA-Z-]+/)?wp-admin$ $1wp-admin/ [R=301,L]

RewriteCond %{REQUEST_FILENAME} -f [OR]
RewriteCond %{REQUEST_FILENAME} -d
RewriteRule ^ - [L]
RewriteRule ^([_0-9a-zA-Z-]+/)?(wp-(content|admin|includes).*) $2 [L]
RewriteRule ^([_0-9a-zA-Z-]+/)?(.*.php)$ $2 [L]
RewriteRule . index.php [L]
In a SubDomain install the .htaccess file will change as follows:
RewriteEngine On
RewriteBase /
RewriteRule ^index.php$ - [L]

# add a trailing slash to /wp-admin
RewriteRule ^wp-admin$ wp-admin/ [R=301,L]

RewriteCond %{REQUEST_FILENAME} -f [OR]
RewriteCond %{REQUEST_FILENAME} -d
RewriteRule ^ - [L]
RewriteRule ^(wp-(content|admin|includes).*) $1 [L]
RewriteRule ^(.*.php)$ wp/$1 [L]
RewriteRule . index.php [L]
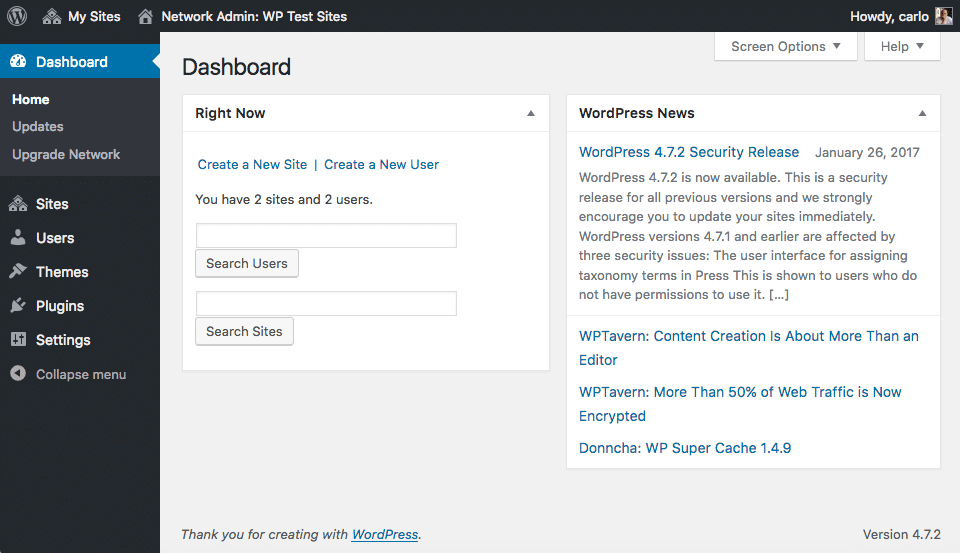
When you’re done with wp-config.php and .htaccess, log out and log in again. The My Sites menu should appear on the left side of the WordPress toolbar.
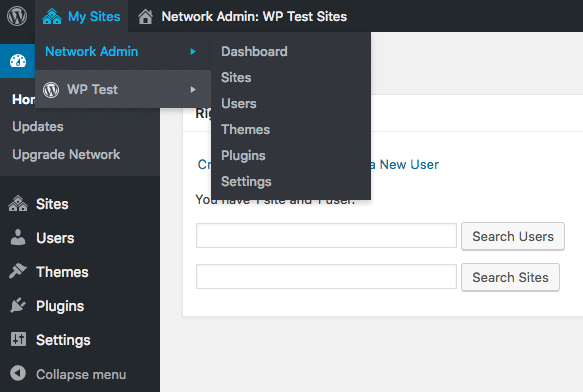
The Network is up and running, and now we can enable the plugins we previously disabled.
Conclusions and Further Reading
From now on you’ll be the Network Super Admin and the original site Admin.
In the Network dashboard, you’ll be able to create, configure and delete sub-sites, install themes and plugins, manage network users, run updates, and configure Network settings.
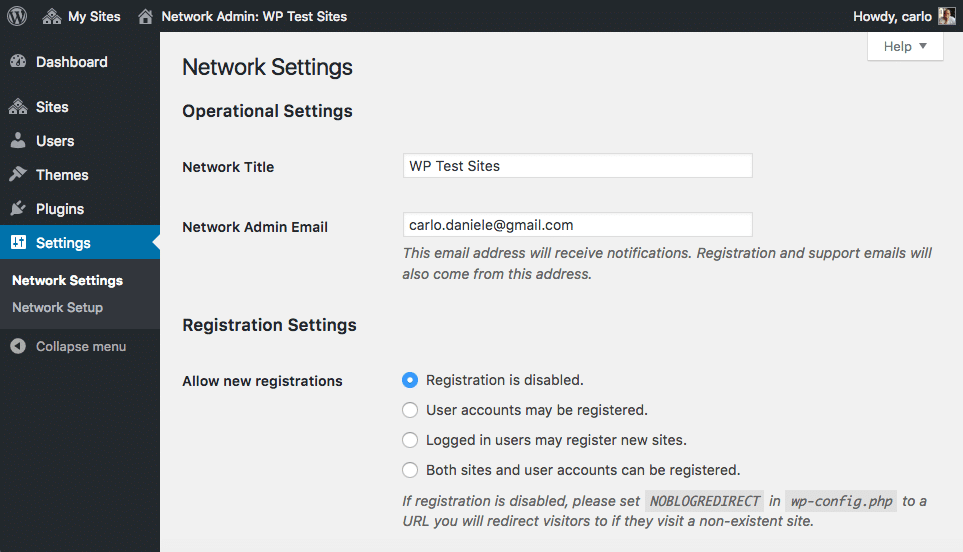
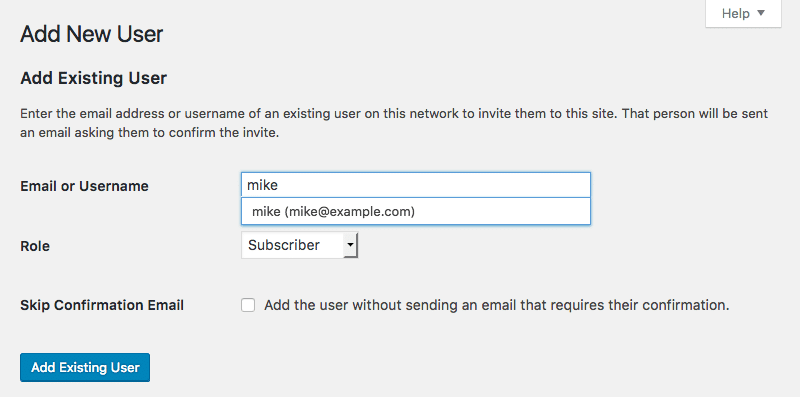
In the sub-site dashboards, you can perform any admin task available to a WordPress admin user with some differences when it comes to themes and plugins, that can be installed, updated and deleted just in the Network admin area.
Sometimes, turning a single site to a Multisite is not as straightforward as it is for Host SEO hosted websites. If you’d need to know more about DNS configuration, system requirements, and other technical details, see the following resources:
- Before you create a Network
- What is WordPress Multisite? The 110% Starter Guide
- Create a Network
- WordPress Multisite Domain Mapping
- Multisite Network Administration
Do you run any Multisite installation? Share with us your experience in the comments below.
Categories
Subscribe Now
10,000 successful online businessmen like to have our content directly delivered to their inbox. Subscribe to our newsletter!Archive Calendar
| Sat | Sun | Mon | Tue | Wed | Thu | Fri |
|---|---|---|---|---|---|---|
| 1 | 2 | 3 | 4 | 5 | 6 | |
| 7 | 8 | 9 | 10 | 11 | 12 | 13 |
| 14 | 15 | 16 | 17 | 18 | 19 | 20 |
| 21 | 22 | 23 | 24 | 25 | 26 | 27 |
| 28 | ||||||
Recent Articles
-

Posted on : Jul 25
-

Posted on : Jul 07
-

Posted on : Apr 07
-

Posted on : Mar 19
Optimized my.cnf configuration for MySQL 8 (on cPanel/WHM servers)
Tags
- layer 7
- tweak
- kill
- process
- sql
- Knowledge
- vpn
- seo vpn
- wireguard
- webmail
- ddos mitigation
- attack
- ddos
- DMARC
- server load
- Development
- nginx
- php-fpm
- cheap vpn
- Hosting Security
- xampp
- Plesk
- cpulimit
- VPS Hosting
- smtp
- smtp relay
- exim
- Comparison
- cpu
- WHM
- mariadb
- encryption
- sysstat
- optimize
- Link Building
- apache
- centos
- Small Business
- VPS
- Error
- SSD Hosting
- Networking
- optimization
- DNS
- mysql
- ubuntu
- Linux


